How do you connect Notion to Motion.io?
Connect Notion to Motion.io and make it so clients can view pages you’ve created in Notion directly from their client portals in Motion.io.
Connecting Notion to Motion.io:
Step 1:
To connect Notion to Motion.io, you’ll first need to sign up for a free account of Super.SO.
Note: While you can add the same Notion page to Motion.io as many times as you’d like with a free account of Super.SO, if you want to add multiple, unique Notion pages to Motion.io, you must sign up for a paid account of Super.SO.
Step 2:
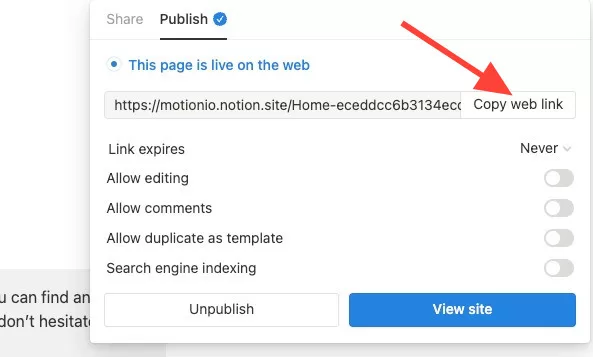
In your Notion account, publish the page you want to add to Motion.io by clicking Share > Publish > Publish to Web.

Step 3:
In the window that appears after clicking “Publish to web” in Notion, adjust the settings so all the toggles displayed are turned off, then click “Copy web link.”
Step 4:
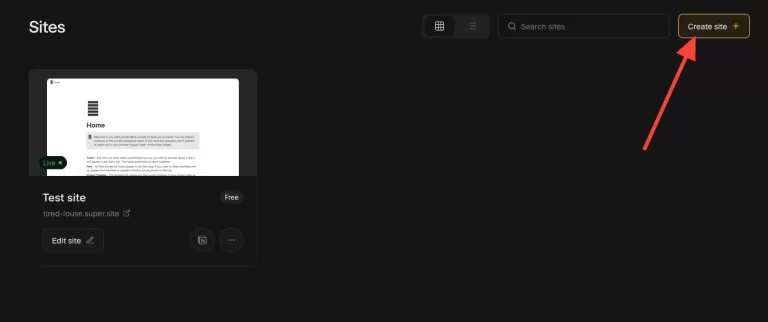
Back in your Super.SO account, click “Create site.”
Step 5:
In the window that appears after clicking “Create Site” in Super.SO, enter a site name (note: site name is for internal use only) and paste the URL you copied in Step 3 into the “Notion share URL” section.

Step 6:
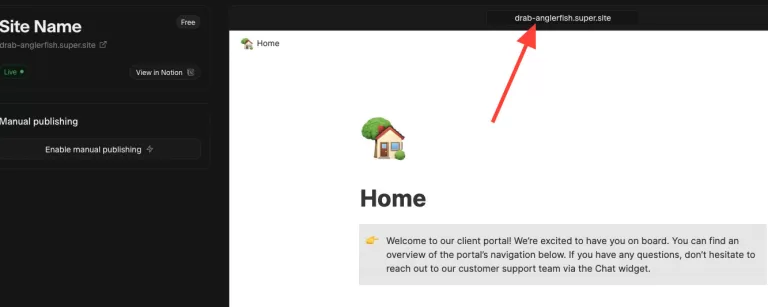
Once your site has been created in Super.SO, copy the URL that appears directly above the page content pulled in from Notion.
Step 7:
Back in your Motion.io account, select the client portal you want to connect to Notion and click “Pages.”
Paste the URL you copied from Super.SO in step 6 into the “App Embed Code” section near the bottom of the page editor screen, select an icon to display along with the title of the tab (optional), and click “Save.”
Final thoughts:
And that does it!
By following these steps, you have successfully connected Notion to Motion.io, making the page you’ve created in Notion and published using Super.SO viewable to clients in their Motion.io client portal.
At last, a simple client portal
Assign tasks, share files, and embed your favorite apps in fully customizable & loginless portals both you and your clients will love.