
May 1, 2025
10 Smart Ways to Use Custom Fields in Motion.io
By
Perry

10 Smart Ways to Use Custom Fields in Motion.io
Whether you’re already using Motion.io with customers or just getting started, there’s one feature that can drastically simplify your client project workflows:
Custom fields.
Custom fields let you store and reuse important project-specific details right inside your Motion.io tasks, contracts, and project tabs.
What does this mean for you? Instead of typing the same information over and over again, custom fields automatically pull in the right details for each client project, exactly where you need them.
In this guide, I’ll share 10 practical ways marketing agencies and consultants can use custom fields in Motion.io.
Why Custom Fields Are a Game-Changer for Agencies and Consultants
If you’re running client projects, chances are you’ve spent more time than you’d like reentering the same information—typing out client details, pasting URLs, or double-checking where a specific spreadsheet went.
Sound familiar?
Custom fields can take that off your plate. They let you store important client information once, and Motion.io will automatically insert it wherever you need it.
Here’s why that makes such a difference:
Reduce human error (and protect your reputation)
Mistakes are bound to happen when you’re manually copying client names, project details, or links from one place to another. It might seem insignificant, but even a tiny typo in a contract or the wrong link in a task can chip away at a client’s trust.
With custom fields, Motion.io automatically inserts the correct information, helping you avoid these slip-ups and keep things professional.
Cut out tool-hopping and context-switching
Agencies and consultants often have client details scattered across multiple platforms, including CRMs, spreadsheets, and Google Drive. And every time you pause to track down a link or copy over client information, it is yet another interruption to your flow.
With custom fields, you can pull that data directly into your workflows, keeping everything in one place. No more digging through tools or switching tabs. Just the right details, right where you need them.
Deliver a more consistent and personalized client experience
Custom fields help you make every client portal, task, or document feel tailored without the manual effort.
Instead of sending generic messages or having to tweak each task individually, you can automate personalization at scale. This helps keep clients engaged and confident that you’re on top of their specific needs.
10 Ways to Use Custom Fields in Motion.io
So, how do these benefits actually play out in your day-to-day work?
Let's take a look at some practical ways you can use custom fields in Motion.io.
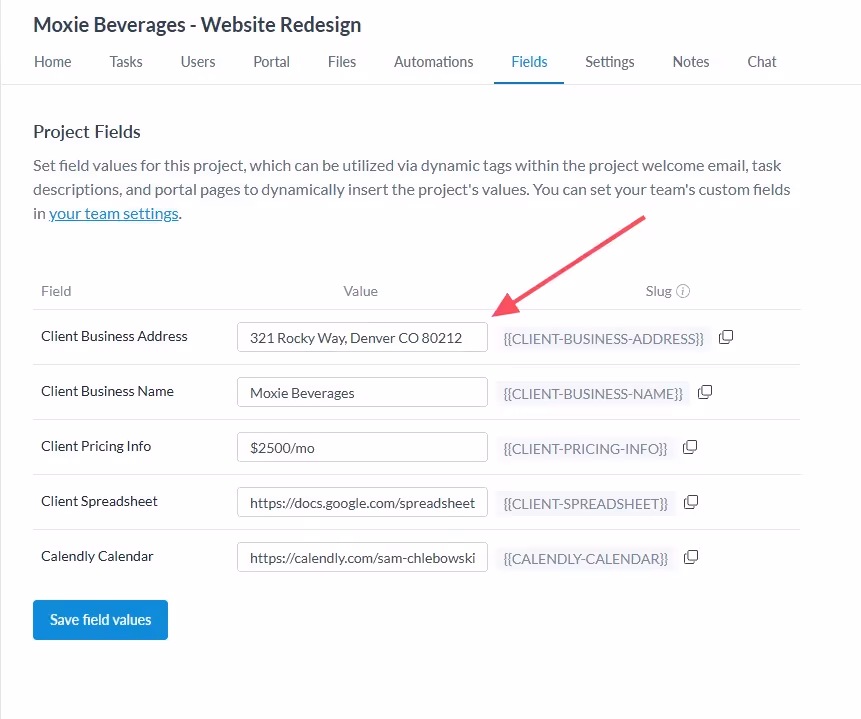
Important: After creating new custom fields in Motion.io, make sure to specify the value for each field within your projects. Just open a project (or project template), head to Settings > Fields, and enter the details—like the client’s name, project start date, or embed link—that should populate anytime that field is used. Alternatively, you can automate the process of setting custom field values by configuring your Motion.io forms to populate them or using Motion.io's Create Project Zapier action.
1. Auto-populate client information in Motion.io contracts
No one wants to manually fill out contracts for every new client.
It’s tedious, error-prone, and let’s be honest: if you’re working with multiple clients, it’s easy to overlook small but important details like the correct company name or project start date.
With custom fields in Motion.io, you can automate this process to:
- Eliminate manual entry errors (no more scrambling to correct a wrong company name).
- Save time by skipping repetitive copy-pasting.
- Keep contracts consistent and professional across all clients.
How to set this up:
- Create custom fields for details like Client Name, Business name, or Project Start Date in Motion.io’s Custom Fields settings.

- In your Motion.io Contract Template, add a new text field and paste the slug for the custom field you wish to populate (e.g., {{CLIENT_BUSINESS_NAME}}) in the "API ID" section.
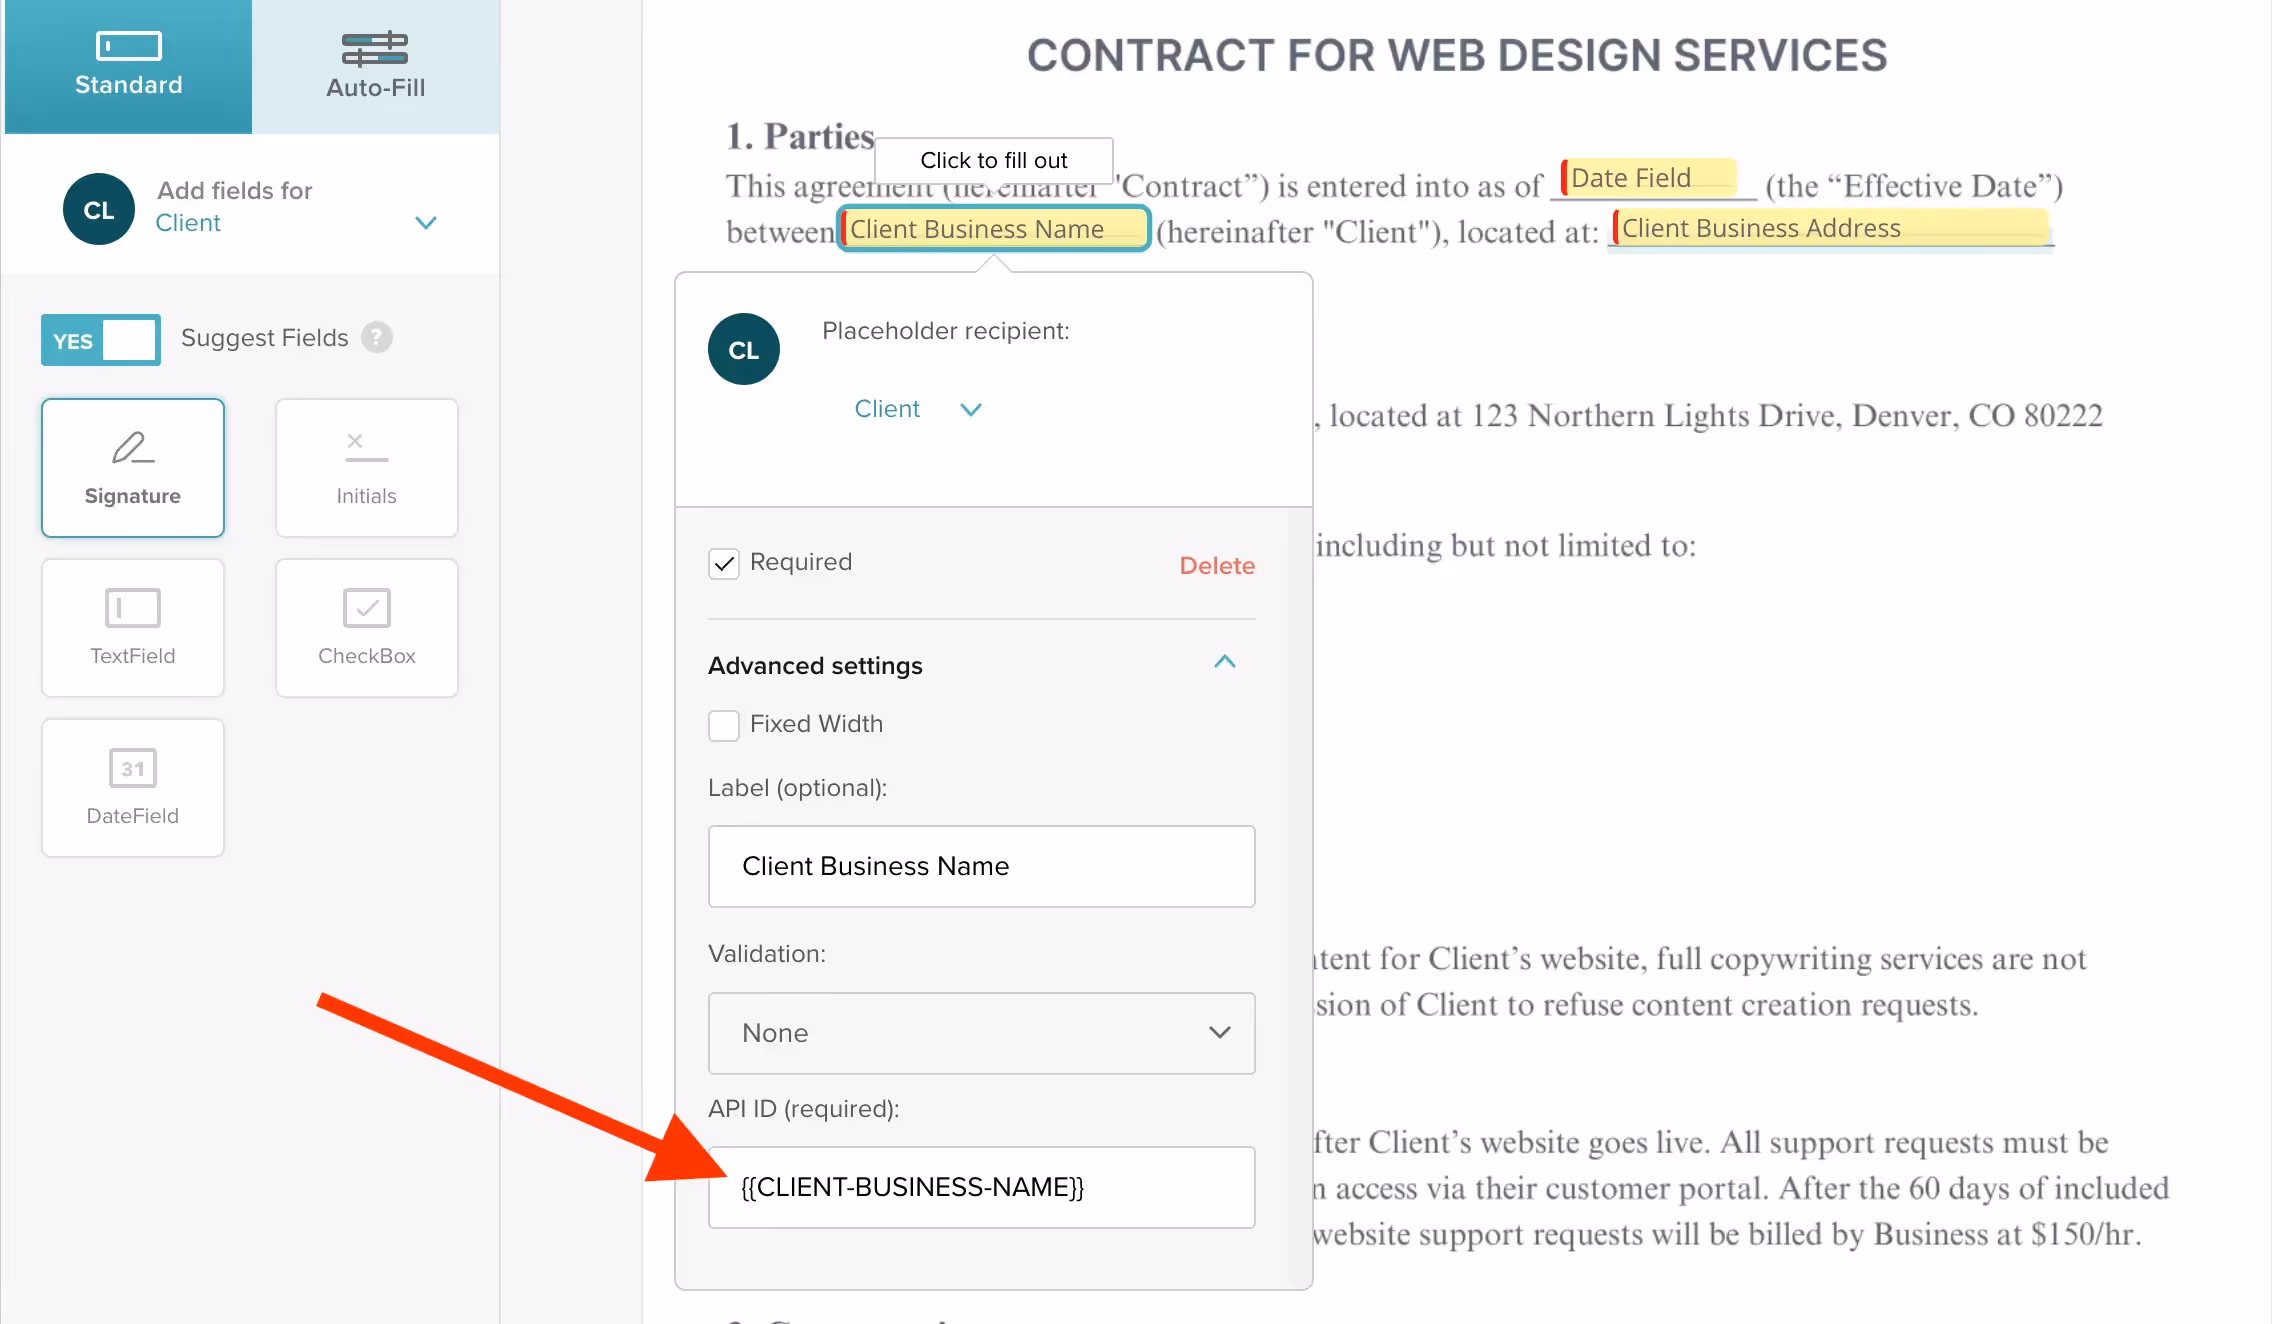
When you send the contract via a task, Motion.io will automatically populate the fields you configured with your client’s custom field data. For full instructions on setting up Motion.io Contract Templates with custom fields, check out this guide.
2. Embed key project resources directly in client tasks
In Motion.io, tasks are the individual to-do's you assign to clients. For example:
- Reviewing a campaign plan
- Uploading some files
- Signing a contract
The question is: how many times have you had to chase down links to shared folders, spreadsheets, or calendars just to paste them into client tasks?
It’s a small step, but when you’re managing multiple clients, that copy-paste routine can quickly add up.
With custom fields, you can store those key embeds once, whether it’s a Google Drive folder, Airtable base, or Notion doc, and have them automatically appear in the right tasks for each client.
How to set this up:
- Create a custom field called something like Campaign Calendar Link or Project Folder URL.
- Use a slug like campaign_calendar or project_folder_url.
- When creating a task in Motion.io, click Embed (in the right-hand sidebar).
- In the embed modal, paste your custom field slug—like {{campaign_calendar}}—into the modal.

Motion.io will replace the placeholder with the actual URL you've specified for the client, displaying the embedded content directly within the task.
3. Auto-fill client-specific details in task descriptions
Every service business knows that personalized instructions keep clients on track. But when you’re managing multiple projects, manually updating client names, campaign goals, or project scopes in every task? It’s an easy place for mistakes.
With custom fields in Motion.io, you can automate this personalization.
Whether it’s a reminder of the client’s target audience, a link to their brand guidelines, or even their preferred contact method, you can populate those details automatically within each task.
- So instead of a generic task description like: "Review the campaign plan."
- You can create something more specific: "Hi {{client_name}}, please review your Q2 campaign plan focused on {{target_audience}}."
How to set this up:
- Create custom fields for any client-specific details you want to include in your task instructions, like Target Audience, Brand Guidelines Link, or Primary Contact Name.
- Use slugs like {{target_audience}} or {[brand_guidelines_link}}.
- In your project or template tasks, insert the slugs for your custom fields where relevant.

Motion.io will automatically replace those placeholders with the right details for each client.
4. Keep project resources handy (without manually updating)
Every Motion.io client portal is a chance to centralize important project information and resources for customers.
Custom fields in Motion.io let you store key links once and automatically display them in project tabs or tasks for clients to access in their portals.
Why this matters:
- Eliminates tedious updates – if a link changes, just update the field value a single time in that project’s settings.
- Clients get a consistent, seamless experience – everything they need is in one place.
- Reduces risk of sharing the wrong link – every client sees their specific resources, not a generic placeholder.
How to set this up:
- Create custom fields such for things like online resources, calendar links, or video URLs.
- Set the values for your custom fields directly in your project template, so they will automatically be included in any projects you create from it.
- Add the slug (e.g., {{resource_link}}) for the custom fields you created to tasks, project tabs, and more to automatically populate them in projects.
5. Embed live dashboards or reports in recurring tasks
Clients love transparency—whether it’s seeing the latest campaign performance or project milestones.
But sending over a static report every week or remembering to update dashboard links in every portal is a lot of admin work.
With custom fields in Motion.io, you can embed live dashboards or reports directly in recurring tasks clients can complete on the schedule you specify. Whether you use Google Looker Studio, Agency Analytics, or another tool, clients can log in and see real-time updates without you lifting a finger.
.avif)
Why this matters:
- Keeps clients engaged – they get on-demand access to performance data, no need to wait for reports.
- Eliminates manual updates – update the custom field value in that project’s settings once, and it updates everywhere.
- Strengthens trust – clients feel confident when they can see progress for themselves.
How to set this up:
- Create a custom field, such as Dashboard Link or Performance Report URL.
- In your project or template, create a new task, click the "Recurring" task option, and specify the schedule you want the task to recur on in the modal.
- Click the "Embed" option in the task composer, and paste the slug for your custom field (ex., {{reporting_dashboard}}).
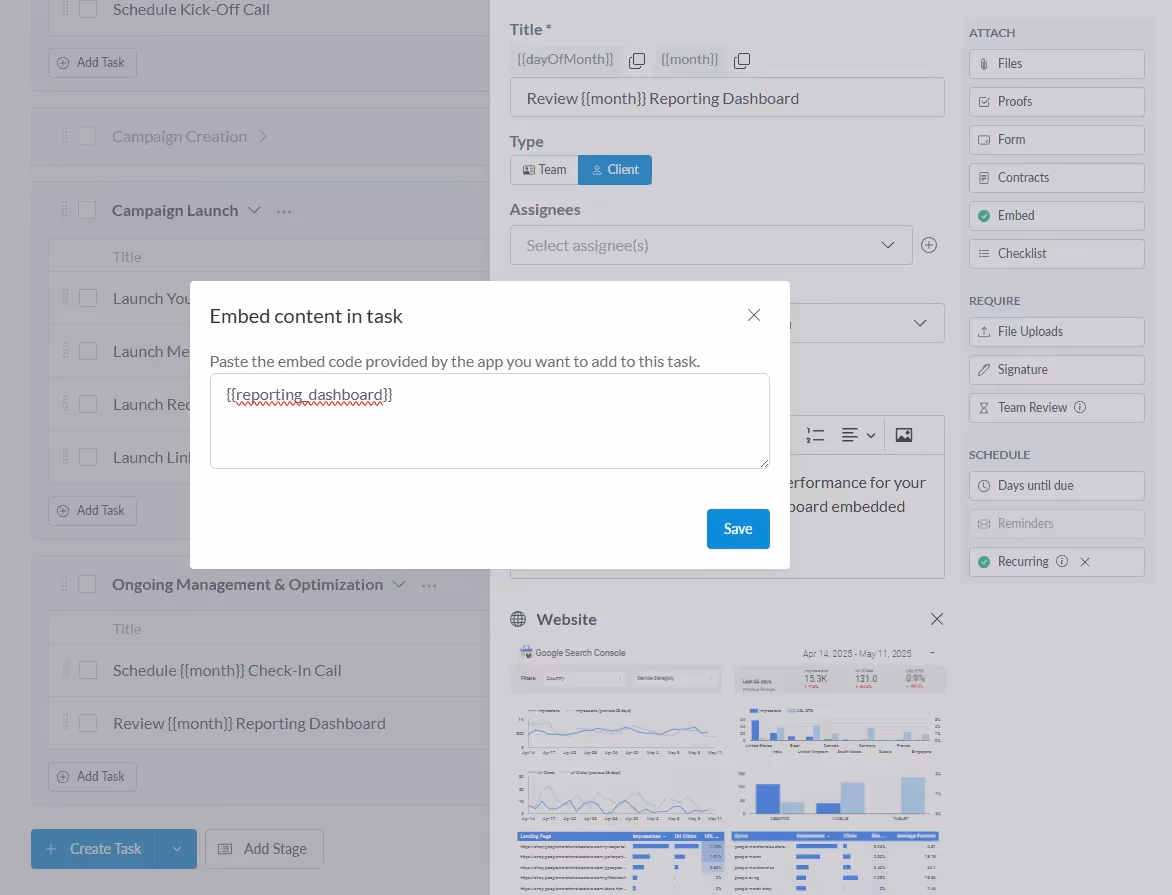
Motion.io will automatically populate each portal with the correct live dashboard for that client.
6. Centralize payment links for clients
Chasing down payments is the last thing you want to add to your workload. But when payment links are tucked away in emails or buried in spreadsheets, clients might miss them.
With custom fields in Motion.io, you can embed client-specific payment links directly in their tasks or project tabs. Whether you use Stripe, PayPal, or another payment processor, clients can easily find their unique payment link right alongside their project details.
This:
- Makes payments easy and visible – clients always know where to go.
- Reduces manual payment reminders – you don’t have to nudge clients; the link is right there.
- Keeps everything in one place – clients handle payments, file uploads, and approvals all in the same portal.
How to set this up:
- Create a custom field like Payment Link in your account settings.
- Enter the slug for the custom field you create (ex., {{payment_link}}) into the App Embed section of a project tab or task.
Following these instructions, you can give clients easy access to payment links at any time through custom project tabs, or on a specific timeline in tasks you assign.
Note: If the payment link changes, just update the value for your custom field in that project’s settings, and it’ll update across the portal automatically.
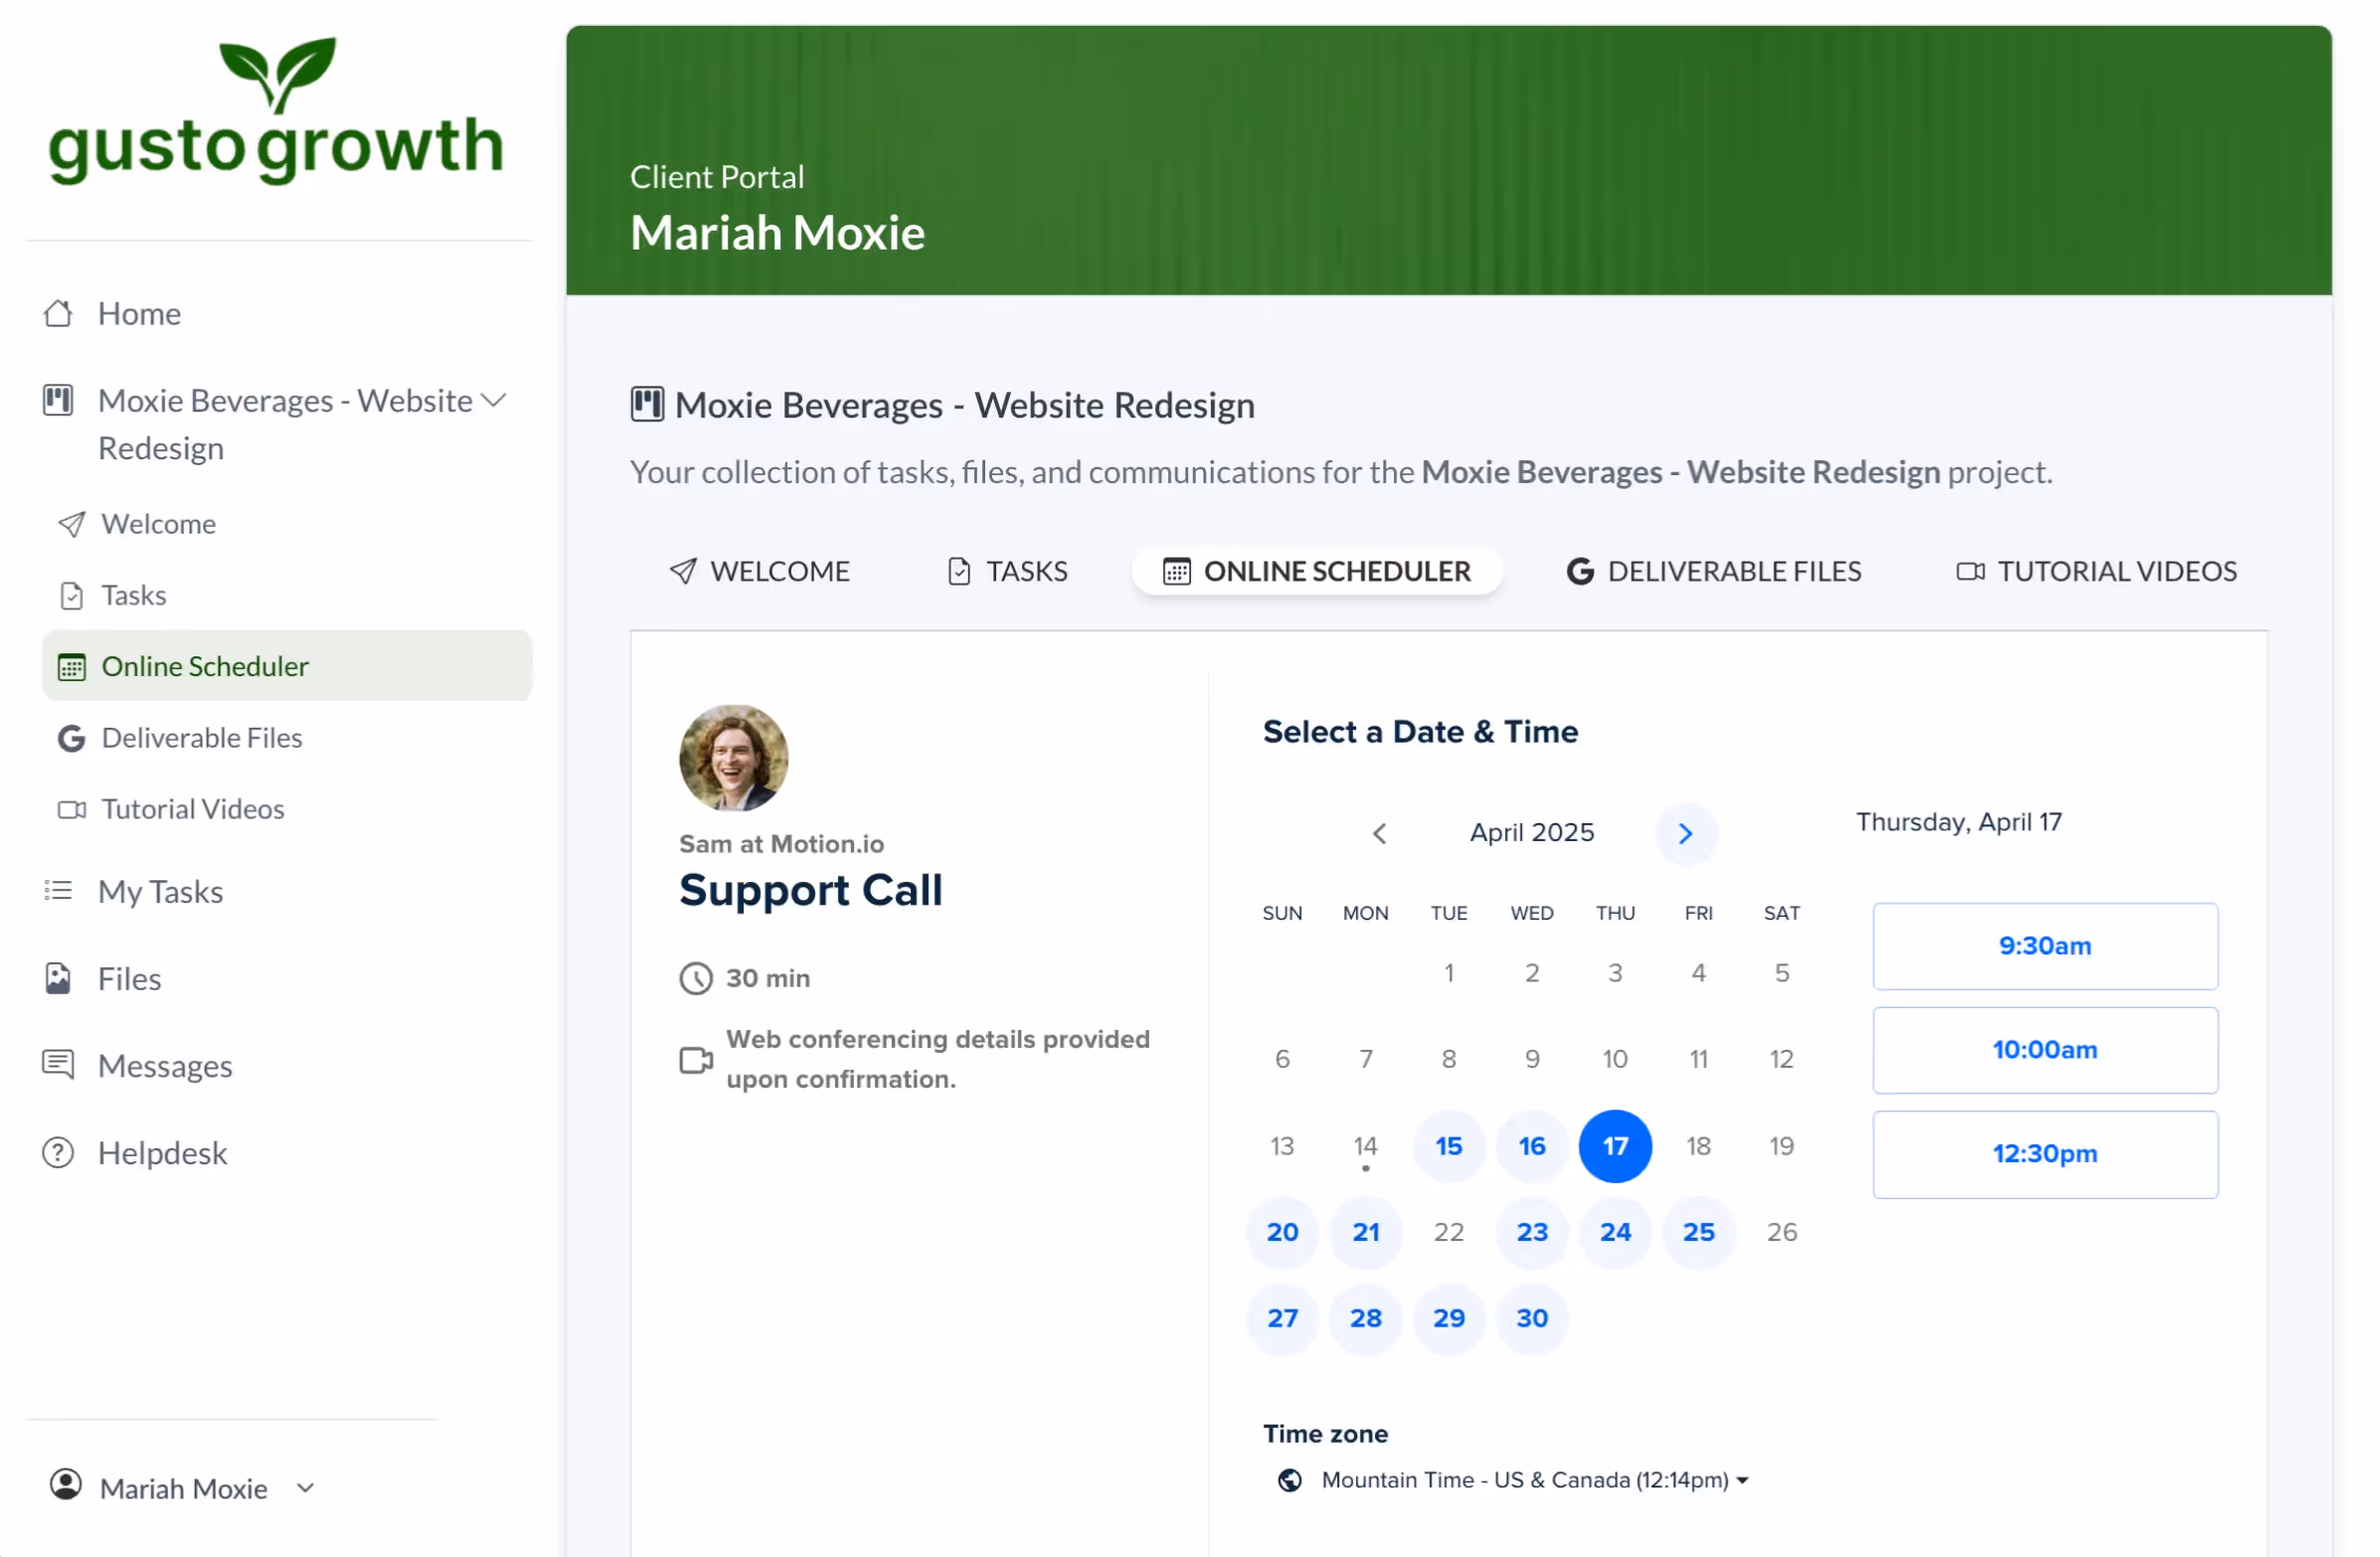
7. Give clients self-serve access to scheduling
Your clients shouldn’t have to dig through emails to find a meeting link or ask when the next project milestone is due. The more you can centralize scheduling and timelines in their portal, the smoother everything runs.
With custom fields in Motion.io, you can embed scheduling tools or project calendars directly into client portals.
This can be a Calendly link for booking meetings or a Google Calendar timeline for project milestones.
Either way, your clients can always check what’s coming up or schedule time with you without needing to reach out.
How to set this up:
- Create a custom field like Scheduler Link or Project Calendar URL.
- Use a slug like scheduler_link or project_calendar.
- In a project tab or task, use the Embed option and insert the placeholder ({{scheduler_link}}).
Now, clients can schedule meetings or view project timelines right from their portal.
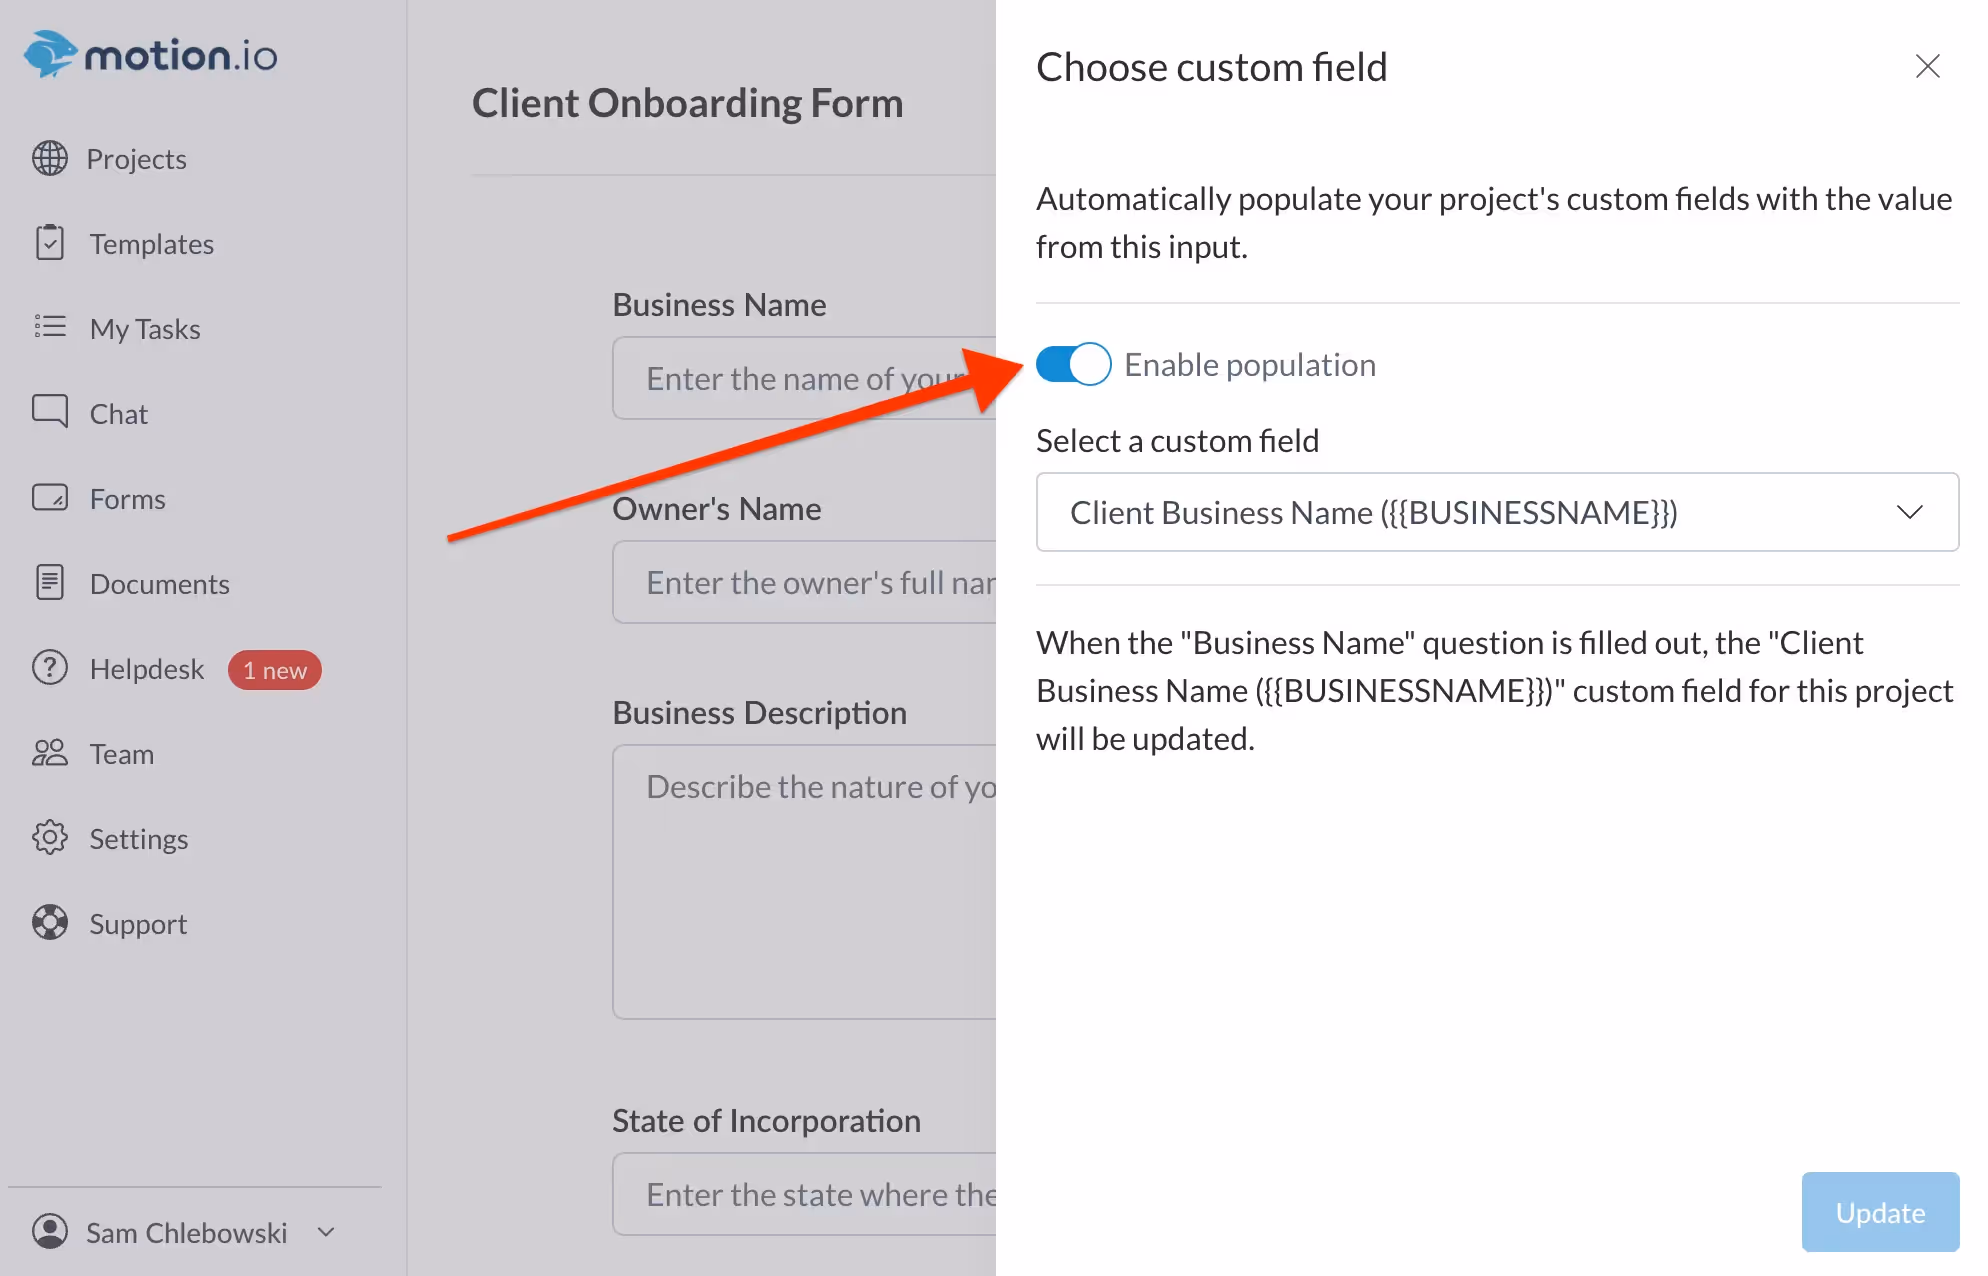
8. Populate details from an onboarding form throughout a project
Every project has its non-negotiables, the core details you need to keep things running smoothly. These often include things like pricing/package information, business names and addresses, and primary contact details.
Despite clients often providing this information when completing an onboarding form, you may find you and your team are often manually re-entering it as projects progress.
Using Motion.io's custom fields, you can eliminate manual data entry work by automatically populating the information clients enter when completing an onboarding form anywhere else in the project.
How to set this up:
- Create custom fields for the data points you always need, such as client pricing, business name, and key contact name.
- In your Motion.io onboarding form, add questions/blocks that correspond to the custom field values you wish to set.
- For each form field you add, select "Populate custom fields," and specify the custom field you'd like to populate for that block.
- In your Motion.io project template, add the slug for each of the custom fields you create wherever they’re needed—in tasks, project tabs, or contracts—and Motion.io will populate them immediately after the client submits their onboarding form.
9. Personalize client portal welcome emails
The little things matter when it comes to client experience. Even something as simple as a personalized greeting or details specific to their project can go a long way.
With custom fields, you can make sure each client sees their company name, project details, or even a custom message every time you invite them to a Motion.io project.
How to set this up:
- Create the custom fields you wish to populate in your client welcome emails.
- Open a Motion.io template or project, and navigate to Settings > Emails.
- Paste the slug for the custom fields you'd like to include into the "Content" section.
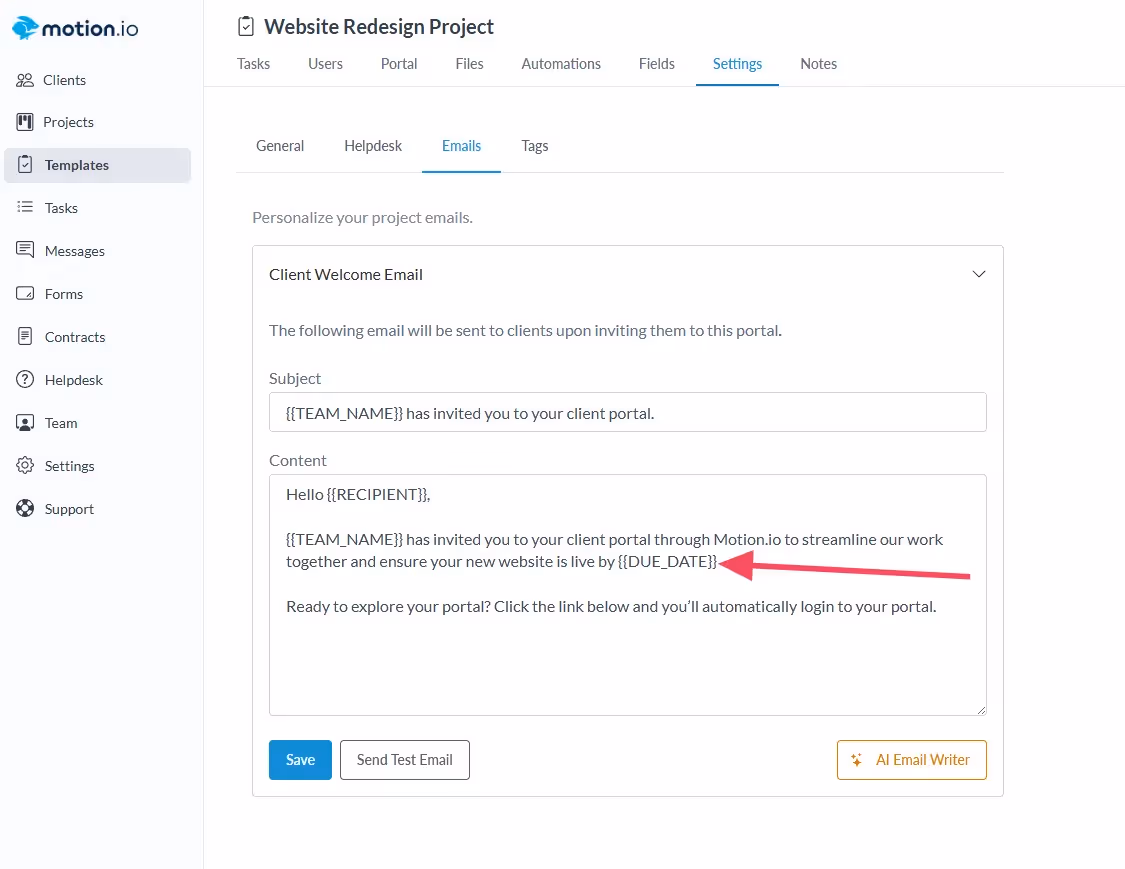
Motion.io will automatically insert those custom field values into the welcome email each client you invite to the project receives.
10. Update client details through a project in seconds
Have you ever had a resource change mid-project, like an email address, calendar link, or website URL, and suddenly had to scramble to update it everywhere you included it?
Instead of manually replacing links in multiple places, you can use custom fields for information you anticipate changing throughout a project. When you update the value of that custom field a single time, Motion.io will populate it in every other place it is used within the project.
For example, let's say you run a website design agency. With the clients you work with, it's common for them to change their business's website URL when redesigning a current site. Following this example, you would:
- Create a custom field named Client Website URL with a slug like {{client_website_url}}.
- Add your custom field slug into every task and tab in the project or template you wish to use it in.
- When a client's website URL changes, replace the value you added initially with the client's new URL.
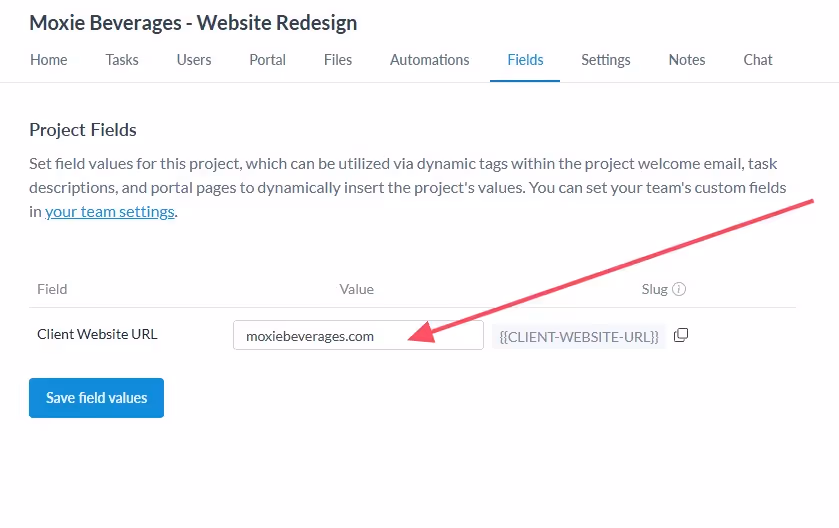
When you update the value for the custom field, Motion.io will automatically flow that update through to every task, contract, or project tab where you’ve used {{client_website_url}}.
Simplify Your Client Projects with Custom Fields
You’ve seen the possibilities. Now it’s about choosing where to start.
Look at your current client workflows and ask: “Where am I repeating myself? Where am I manually sharing the same details or links?”
Pick one process and add a custom field to simplify it.
Not using Motion.io yet? Custom fields are just one way it streamlines client projects.
With features like loginless portals, automated client reminders, and reusable project templates, Motion.io helps you spend less time on admin work and more time delivering results. Click here to start a free trial or schedule a demo to see Motion.io in action.


Scale your onboarding, not your overhead
Motion.io gives you the workflows, visibility, and automation to take on more clients--without the chaos.