
Jun 18, 2025
Getting Started with Motion.io: A Step-by-Step Guide for New Users
By
Sam Chlebowski
Motion.io brings every aspect of your client work—onboarding, communication, task tracking, and more—into one centralized platform, purpose-built for agencies, consultants, and other service professionals. With Motion.io, your team can streamline client workflows without the usual back-and-forth.
Clients enjoy a seamless, login-free experience that makes it effortless to complete tasks, share files, and stay on track—no tech headaches, no confusion.
Let’s dive into the core building blocks of Motion.io so you can start delivering a smoother client experience right away.
Why Motion.io?
Unlike customer relationship management (CRM) platforms—designed primarily for managing sales pipelines and engaging prospects—or traditional project management tools, which excel at internal collaboration but often confuse clients, Motion.io is purpose-built for the post-sale client experience.

From the moment a client signs on, Motion.io makes it simple for them to provide information, approve deliverables, and track project progress—all without requiring your team to chase them down. It streamlines client communication, centralizes internal collaboration, and ensures that every task, approval, and file stays organized in one place.
- All-in-one simplicity: No need to stitch together multiple tools for email reminders, project timelines, task management, and client/team collaboration—Motion.io brings it all into one streamlined platform.
- No more client chasing: Stop following up manually for signed contracts, submitted forms, or missing files. Motion.io automatically and politely reminds clients to provide the right information at the right time.
- A seamless, on-brand experience: Deliver a polished and professional client experience with a fully white-labeled portal. Clients can view project updates, complete tasks, communicate with your team, and access other business tools—no logins or accounts required.
Motion.io gives you everything you need to keep client projects moving—without juggling multiple platforms or chasing down responses.
How to Get Started with Motion.io
In this guide, we’ll walk you through the essentials of getting started with Motion.io. You’ll learn how Motion.io works, including key settings, customization options, and configuration features that help you tailor the platform to your workflow. We'll also highlight important functionality to understand as you prepare to launch projects with real clients confidently and efficiently.
Account Setup
Before diving into the specific features of Motion.io related to your projects and clients, it’s important to start with the foundational setup. The sections below cover account-wide settings that we recommend configuring as soon as you log in for the first time.
Client Portal Settings
When you first sign up for Motion.io, you’ll be prompted to enter your business information and branding. These details—such as your company name, logo, and brand colors—are automatically applied to every client portal you create.
To update this information or access additional customization options, go to your Account Settings page. This page is accessible only to you and other team members with the Administrator role.
Below is a breakdown of the key customization tabs available:
🎨 Branding Tab
Use the Branding tab to:
- Update your company name, logo, and primary brand color
- View and customize your client portal link (e.g.,
yourbusiness.motionportals.com) - Edit your preferred date format and time zone for client notification emails

👉 Want to learn more about the Branding tab and its settings? [Click here]
🧩 Portal Tab
Located next to the Branding tab, the Portal tab allows you to:
- Require passwords by disabling magic links for enhanced client security
- Upload a custom header image to personalize each portal
- Set up default pages that automatically appear in every new client portal
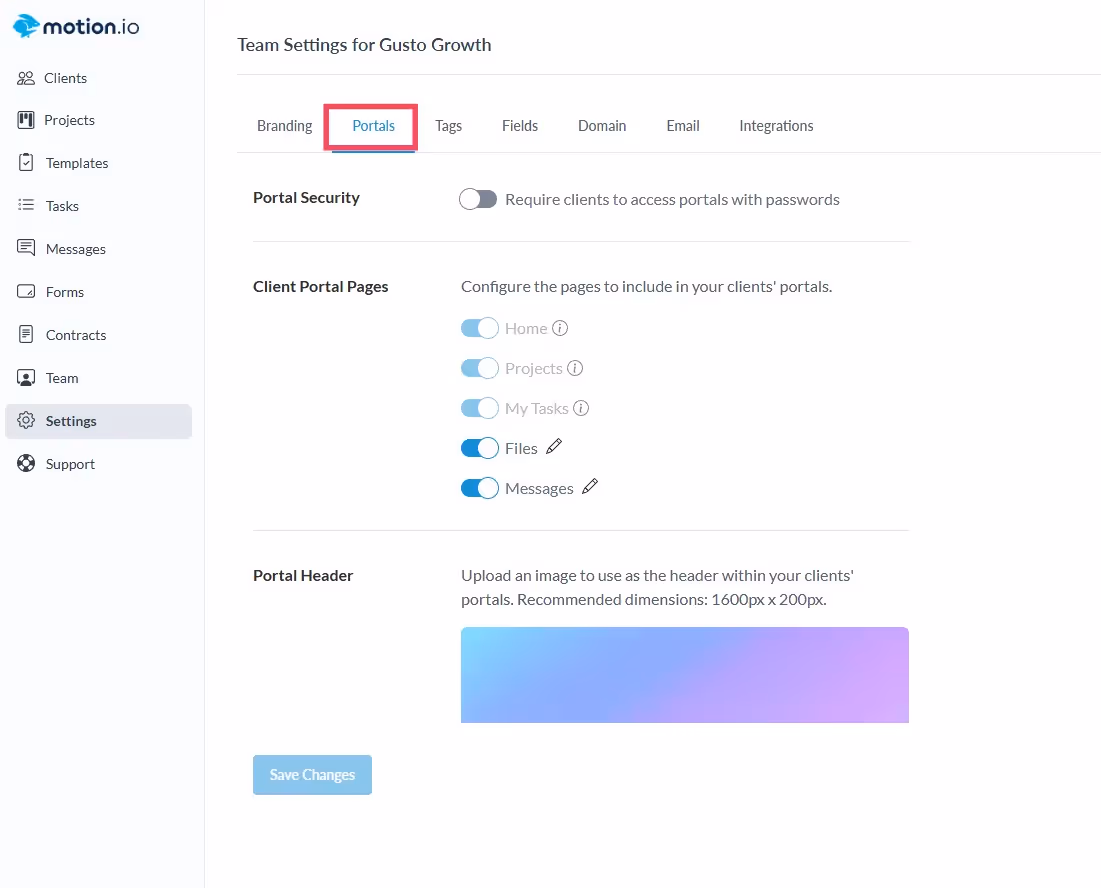
👉 Want to learn more about the settings on your account's Portals tab? [Click here]
🌐 Domain & Emails Tabs
Available with the Scale plan, these tabs provide full white-labeling capabilities:
- Set up a custom domain for your client portals (e.g.,
portal.yourbusiness.com) - Configure white-labeled email sending, so all client communications appear to come directly from your business email domain
👉 Want to learn more about configuring the white-label settings on the Domain and Email tabs? [Click here]
💻 Adding Team Members
In most cases, anyone on your team involved in client-facing work should have access to your Motion.io account. This ensures they can easily download files, access project details, and collaborate seamlessly across client projects.
To invite a new team member:
- Click "Team" in the left-hand sidebar
- Select "+ Invite member to team"
- Enter their information and assign the appropriate role
👉 Want to learn more about inviting and managing team members in Motion.io? [Click here]
Creating Your First Project
📁 Projects
A Project is your team’s internal workspace. It contains all the tasks, files, automations, and communication needed to deliver work for a specific client or company.
This is where your team builds the process that clients will move through—assigning tasks, uploading documents, setting deadlines, and collaborating behind the scenes.
Projects also give you the ability to create and manage Project Tabs—highly customizable pages you can use to share information, resources, or even embed third-party apps and websites that are unique to each project.
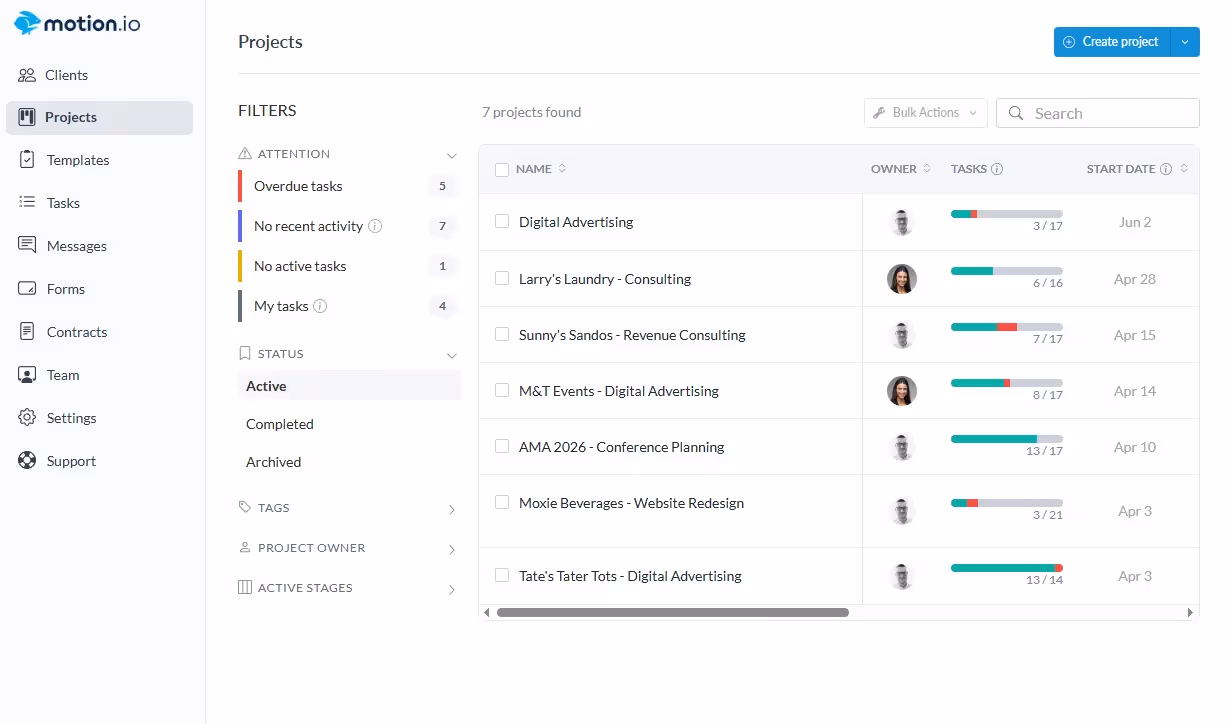
In Motion.io, the Projects Dashboard provides your team with a quick way to create new projects (either from scratch or from a template) as well as access the status, activity, and other important information about each project you manage in one centralized view.
🌐 Portals
A Portal is your client’s window into the work you're doing. It’s how they access the project(s) you’ve invited them to.
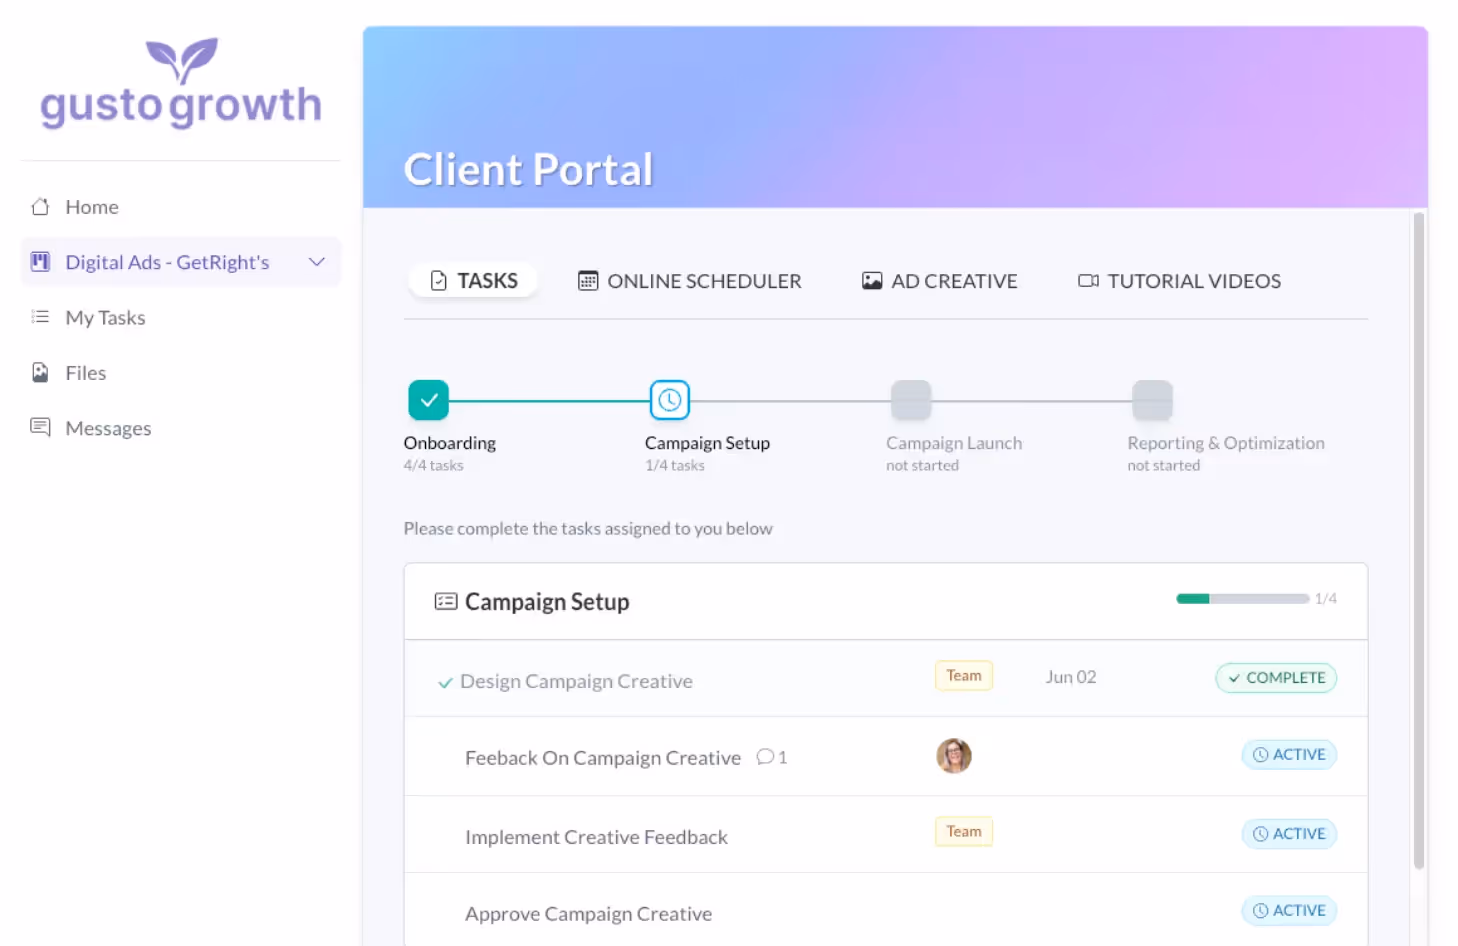
Through their portal, clients can:
- ✅ Complete assigned tasks
- 📅 View project updates and timelines
- 📎 Upload files, provide approvals, and communicate directly with your team
Once a client is invited to a project, the name of that project—and its associated tabs—will appear directly beneath the “Home” page in their portal, making navigation intuitive and organized.
Creating Tasks
After creating your first project, you’ll be taken directly to its Tasks page. In Motion.io, every project is powered by Tasks—individual action items that guide both your team and clients through each phase of the project. Tasks define what needs to be done, who’s responsible, and how to complete it, helping everyone stay aligned and on track from start to finish.
Need a signature? A logo upload? A proposal review? Tasks handle it all.
They’re flexible enough to support any workflow and can be assigned to either your internal team or your clients.

Once a task is assigned, Motion.io:
- Automatically notifies the assignee
- Sends follow-up reminders if the task isn’t completed by the deadline
- Includes magic links that take clients directly to the exact task in their portal—no logins, extra clicks, or confusion
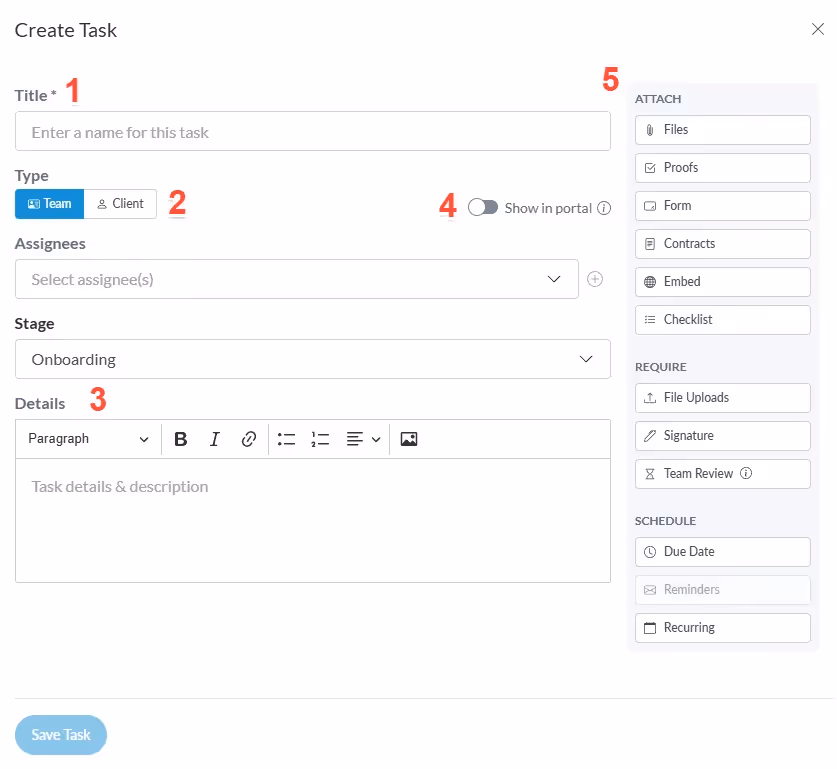
🛠️ Task Composer Overview
Motion.io’s Task Composer offers a consistent, user-friendly interface for creating all types of tasks. Alongside the Stage field (to choose where the task belongs) and Assignees field (to assign it to one or more people), here’s a quick guide to the other key fields:
- Title – A task title is required to save. This name will be visible to the assigned clients or team members when they view and complete the task.
- Task Type Toggle – Located in the upper-left corner, this toggle lets you switch between creating a client task or a team task.
- Details – Use the rich-text editor to add descriptions, context, images, or links. These details appear at the top of the task when it’s viewed by the assignee.
- Show in Portal Toggle – When creating a team task, this toggle controls whether or not the task appears in the client portal.
- Task Options – Add forms, files, contracts, embed external websites or apps, and configure task settings like due dates and automated reminders.
👉 Want to explore each Task Option in detail? Click here.
⏰ Automated Task Reminders
In Motion.io, you can add a due date to any task when assigning it to a client or team member. Once a due date is set, Motion.io takes care of the follow-up. Assignees will receive automated email reminders about upcoming or overdue tasks, so you don’t have to chase clients or nudge your team manually. This makes it easy to stay on schedule without constant check-ins.

Additional Project Settings
Before we move on, let’s take a look at a few additional project settings. While these options can be configured for individual projects, they’re especially powerful when set up within a Project Template—which we’ll cover shortly. Setting them up ahead of time helps ensure consistency across projects and saves time, particularly if your team uses a repeatable workflow.
Project Tabs
While Account Settings and Branding Tabs apply across all projects, Project Tabs give you precise control over the information each client can access—on a per-project basis.
As mentioned earlier, once you invite a client to a project, that project will appear beneath the Home page in their portal. Clients can then access various tabs that contain information specific to that project. To customize which tabs a client sees, open any Project or Template, then click Portal in the top navigation bar.
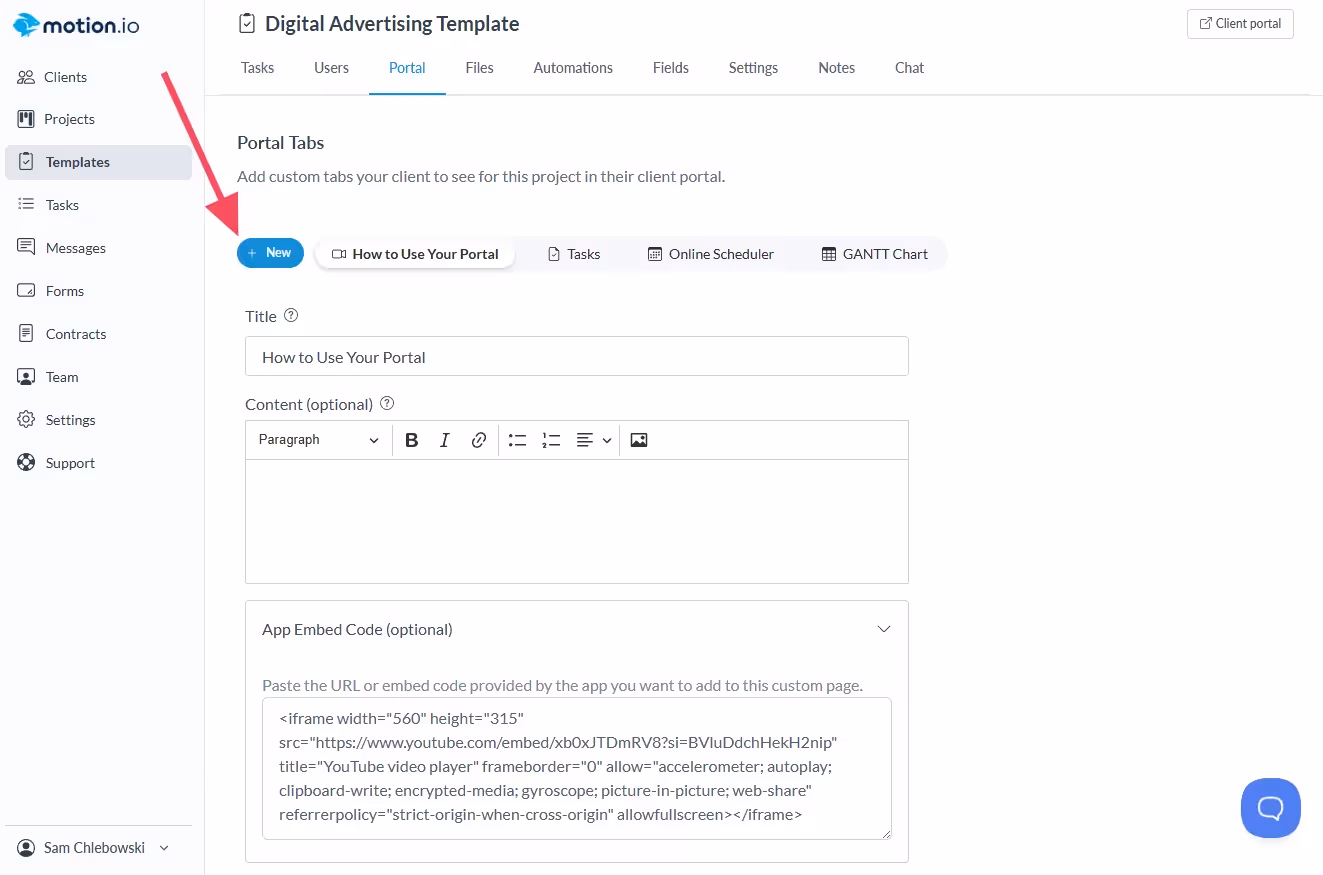
🛌 Default Project Tabs
Motion.io includes two default tabs:
- Welcome Tab - This tab features placeholder messaging welcoming your client to their project. You can edit the content to match your tone and onboarding process—or remove the tab entirely if it's not needed.
- Tasks Tab - Here, clients can view all their project tasks, along with a visual progress tracker that provides clarity on current status. While you can rename the Tasks tab to better fit your workflow, it cannot be deleted—since it’s essential to how clients interact with their project.
🔹 Custom Project Tabs
Beyond the defaults, Motion.io allows you to create fully custom tabs tailored to each client’s experience. Use them to share key resources, timelines, FAQs, or anything else that enhances communication and transparency.
👉 Want to learn more about creating, customizing, and managing project tabs? [Click here]
Automations
Motion.io’s built-in automations help your projects progress smoothly—without constant manual follow-ups or repetitive tasks. They allow your team to focus on high-value work, while Motion.io handles the routine steps in the background.
Automations follow simple logic: "When X happens, do Y."
You select a trigger (e.g., a task is completed or a client is added) and pair it with an action (e.g., assign the next task, show a hidden portal page, or send a notification).
Once configured, automations run automatically behind the scenes, keeping your projects moving without intervention.

🔁 Common Automation Examples:
- ✅ When a task is completed → assign the next task
- 👤 When a client is added to the project → show a hidden portal page
- 📝 When a document is signed → notify a team member
- 📦 When a stage is marked complete → unlock a new portal section
👉 Want to learn more about creating, customizing, and managing project tabs? [Click here]
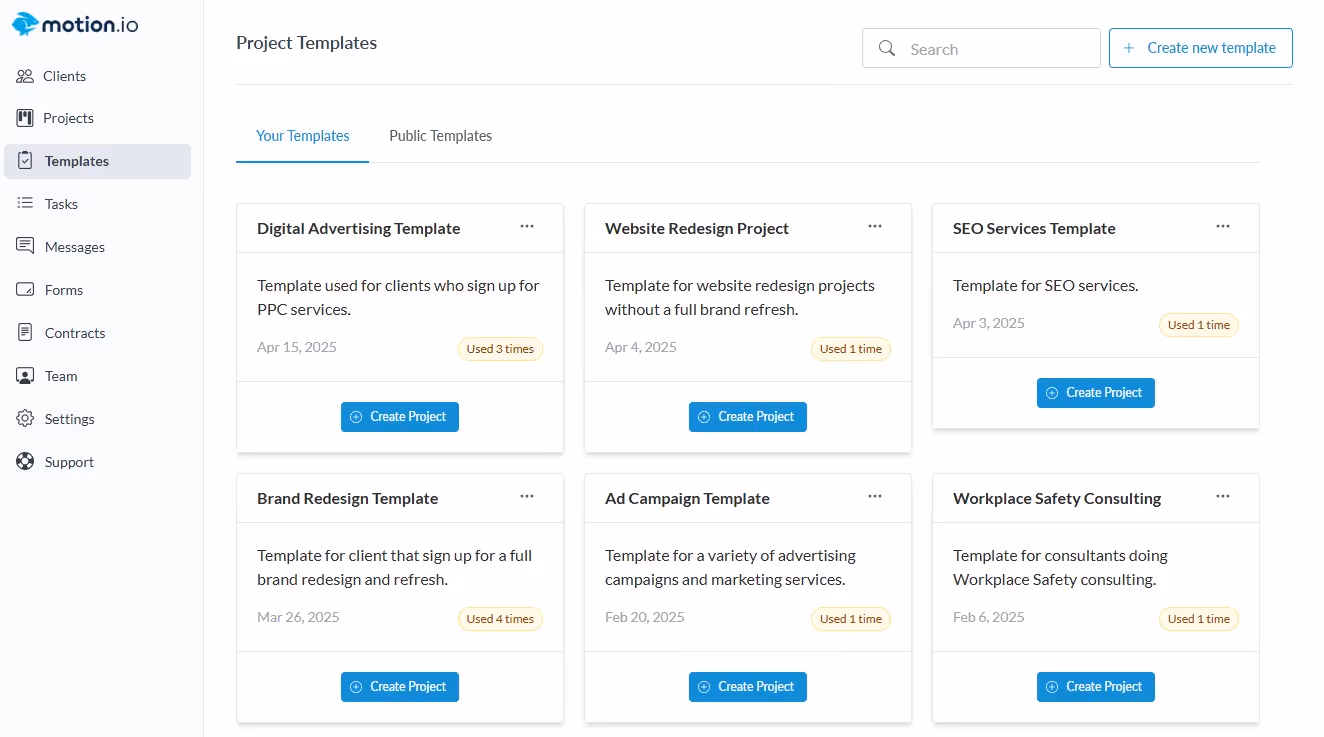
Creating Project Templates
If you find yourself creating the same tasks, stages, and project tabs, for every new client, templates can save you a ton of time. Motion.io's Project Templates feature allows you to create new projects that automatically populate with all the tasks, stages, and portal pages you need without starting from scratch.
🛠️ How to Create Project Templates
You can create a Project Template in three different ways, depending on your needs:
From an Existing Project - Once you’ve built out a project exactly how you want it, you can manually save it as a template.
To do this:
- Go to your Dashboard and select the project.
- Click Settings, then choose Copy to Template.
This will create a new template based on that project and add it to your Template Library.
From Scratch - You can also build a new template directly from the Templates tab:
- Click Create New Template.
- Give it a name and description.
- Then build it out by adding stages, tasks, automations, and client portal settings as needed.
This option is ideal if you're starting from a defined process or standard workflow.
From the Public Template Library - Need a head start? Motion.io offers a collection of public templates you can use and customize:
- From your account sidebar, click Templates, then select the Public Templates tab.
- Browse available options—you can preview a template by clicking the eye icon in the upper-left corner.
- When you find one you like, click Save to Your Templates to add it to your library for customization.
After creating a Project Template, you can create new projects from it that will populate with all of the tasks, stages, and portal pages you need for a client project in seconds.
Launching Your First Project
Once you’ve created a project—whether from scratch or using a template—the next step is to add your clients and begin assigning them tasks. Here's a step-by-step breakdown of how it works:
👤 Add Clients to the Motion.io Directory
Before inviting a client to a project, we recommend adding them to your Client Directory. This lets you quickly give them portal access when you're ready—without any delays.
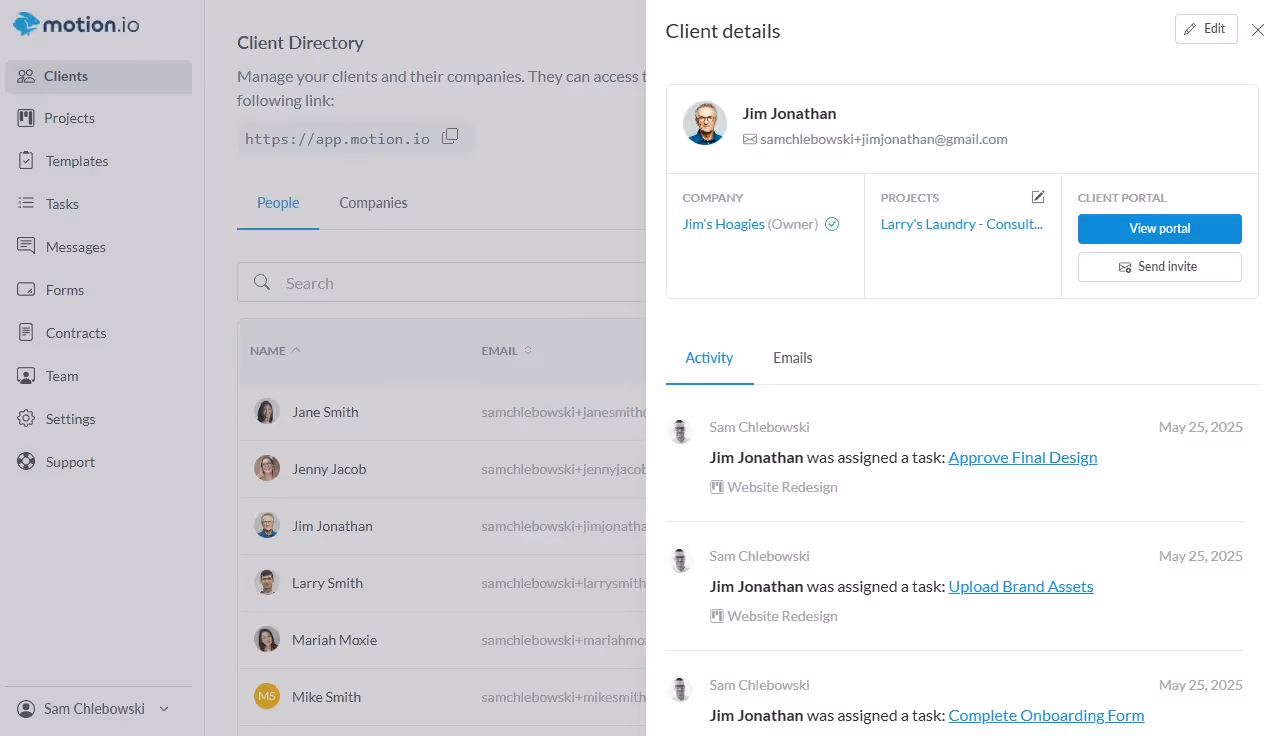
To add a client to the directory:
- Click the Clients tab in your sidebar.
- Navigate to the People tab.
- Click Add Person in the upper-right corner.
- Fill out the client’s details in the modal that appears.
👉 Want to learn more about how Motion.io's Client Directory works? [Click here]
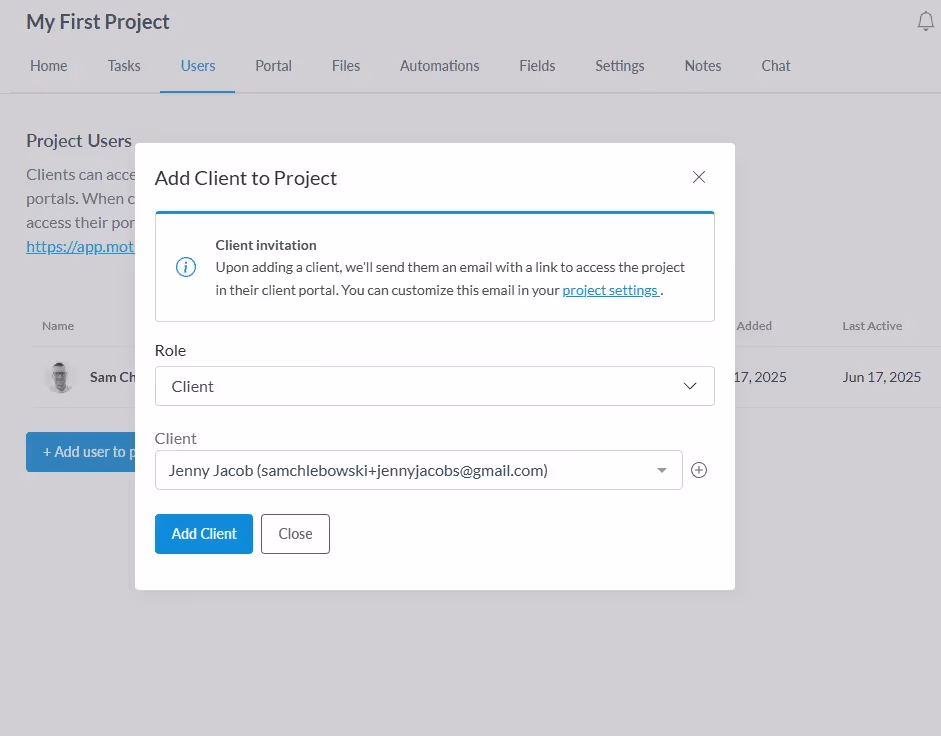
📩 Invite Clients to a Project
Once a client is in your directory, you can easily add them to a specific project:
- Open the project and go to the Users tab.
- Click Add User to Project.
- Select the client from the dropdown menu.
Clients will automatically receive a branded invite email with a magic link that gives them instant access to their portal—no login or account creation required.
👉 Want to learn more about inviting clients to Motion.io projects? [Click here]
✅ Assign Tasks to Clients
You can assign tasks to clients individually or in bulk, depending on your workflow.
To assign multiple tasks at once:
- Navigate to the Tasks tab of your project.
- Select the tasks you want to assign.
- Click the Bulk Actions dropdown and choose Set Assignees.
- Select the client(s) to assign the tasks to.

💡 Pro Tip: When you add your first client to a project, Motion.io will prompt you to assign them to all existing tasks. It’s a quick and convenient way to kick off your project and give clients immediate access to everything they need in their portal.
🚀 Send Tasks to Clients
Tasks in Draft status are invisible to clients—they can’t view them, complete them, or receive reminders. To make tasks accessible in the client portal, they need to be sent.
Here’s how to do it:
- Individually: Use the Task Composer to send tasks one at a time.
- In Bulk:
- Go to the Tasks tab.
- Select the tasks you want to send.
- Open the Bulk Actions dropdown and choose Send Tasks.
- Via Automation: Use Motion.io’s Activate Task or Activate Stage automation actions to automatically send tasks at the right time.
Sending tasks ensures your clients get what they need—when they need it—with minimal effort from your team.
👉 Want to learn more about sending tasks in Motion.io? [Click here]
Managing Projects
Motion.io makes project management simple by centralizing client to-do’s and internal team deliverables in one place. This unified view helps you quickly spot roadblocks, dependencies, and next steps—so you can keep projects moving forward and clients informed, without exposing behind-the-scenes details.
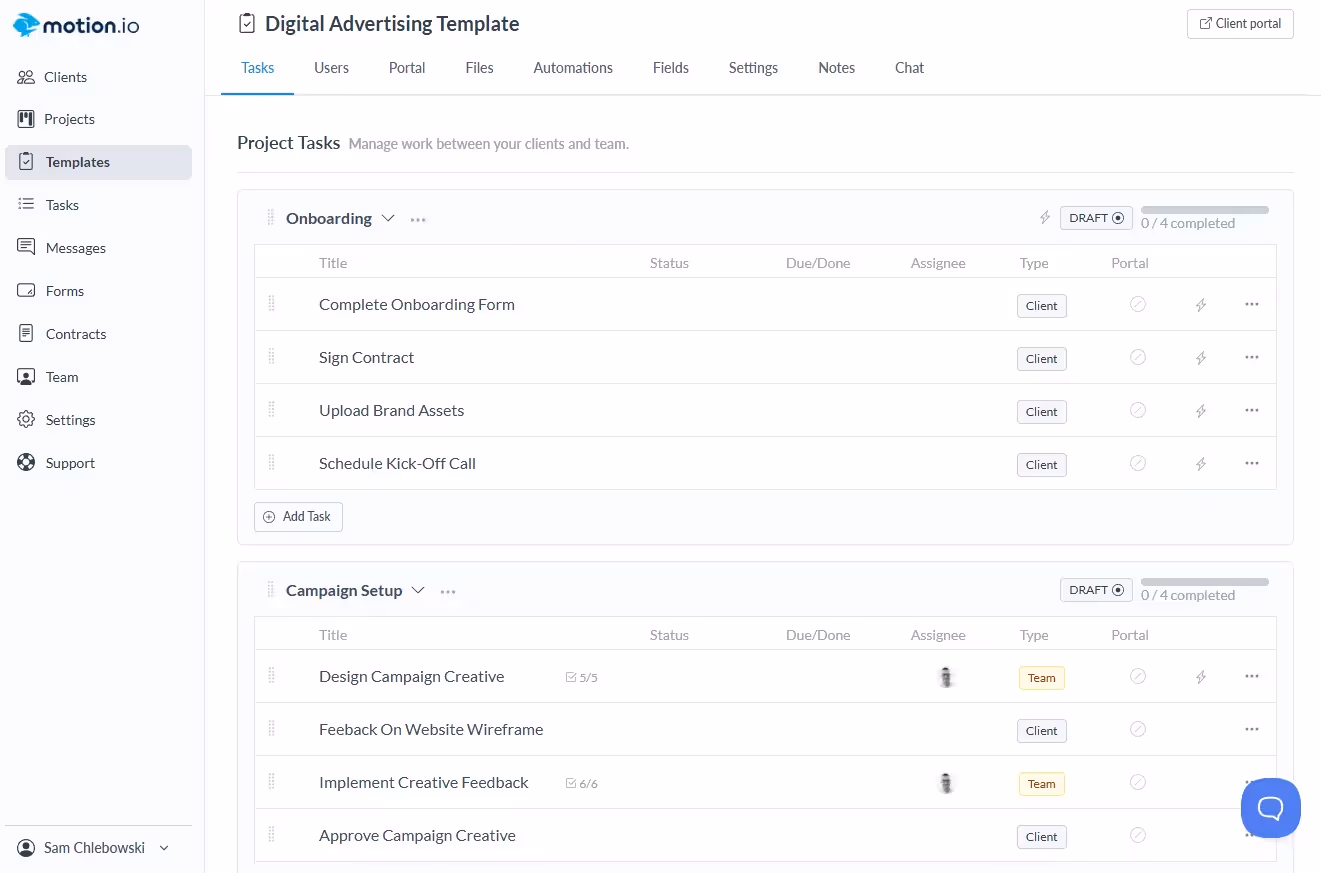
🗂️ List View vs. Board View
Use List View when setting up projects or templates. It’s where you’ll:
- Create and organize tasks
- Group tasks into stages
- Configure task settings and automations
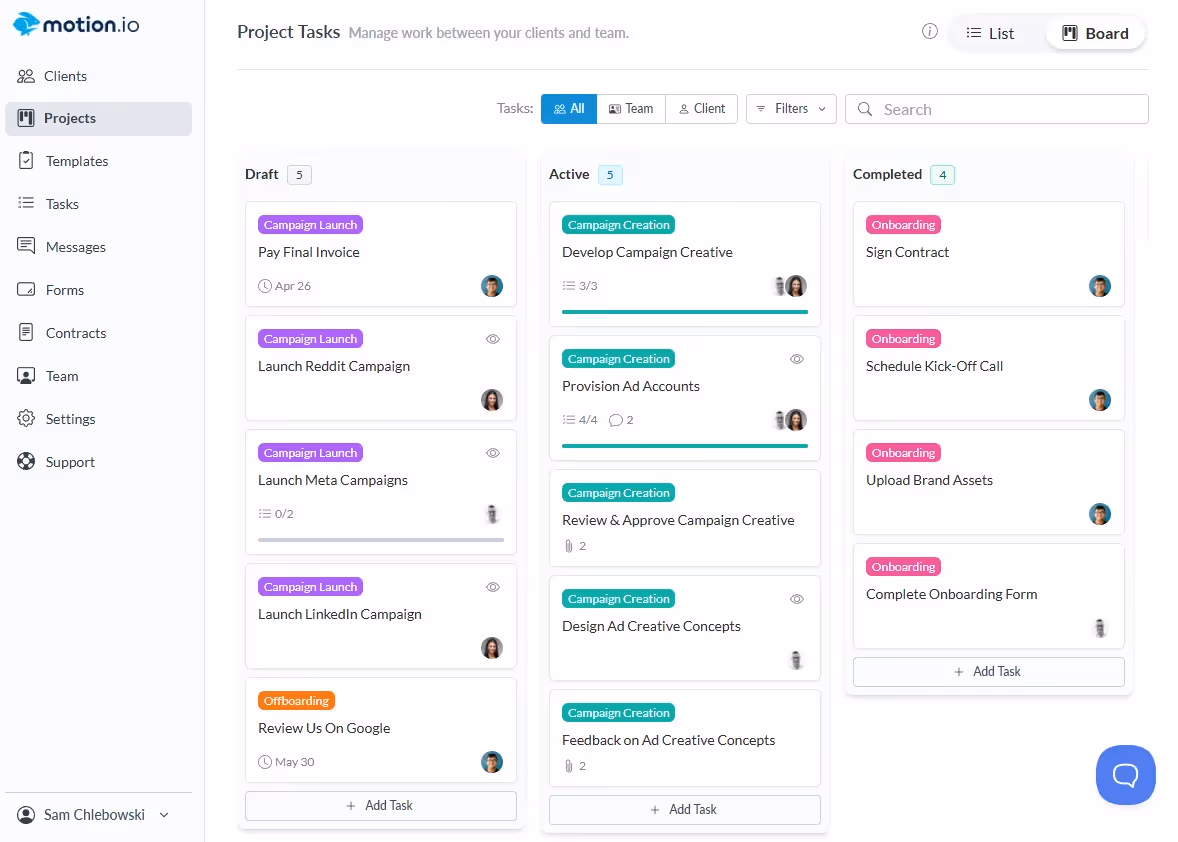
Board View is designed for day-to-day execution and collaboration. It features a Kanban-style layout with four columns: Draft, Active, Completed, and Archived. You can drag tasks between columns to instantly update their status.
Need a client to take action? Just create a client task, move it from “Draft” to “Active,” and Motion.io will automatically notify the client—directing them to complete the task in their portal.
📌 Tasks Page
Whether you're a project manager tracking overall progress or a contributor managing day-to-day work, the Tasks Page in Motion.io gives you centralized visibility across all your projects—helping you stay organized, focused, and in control.
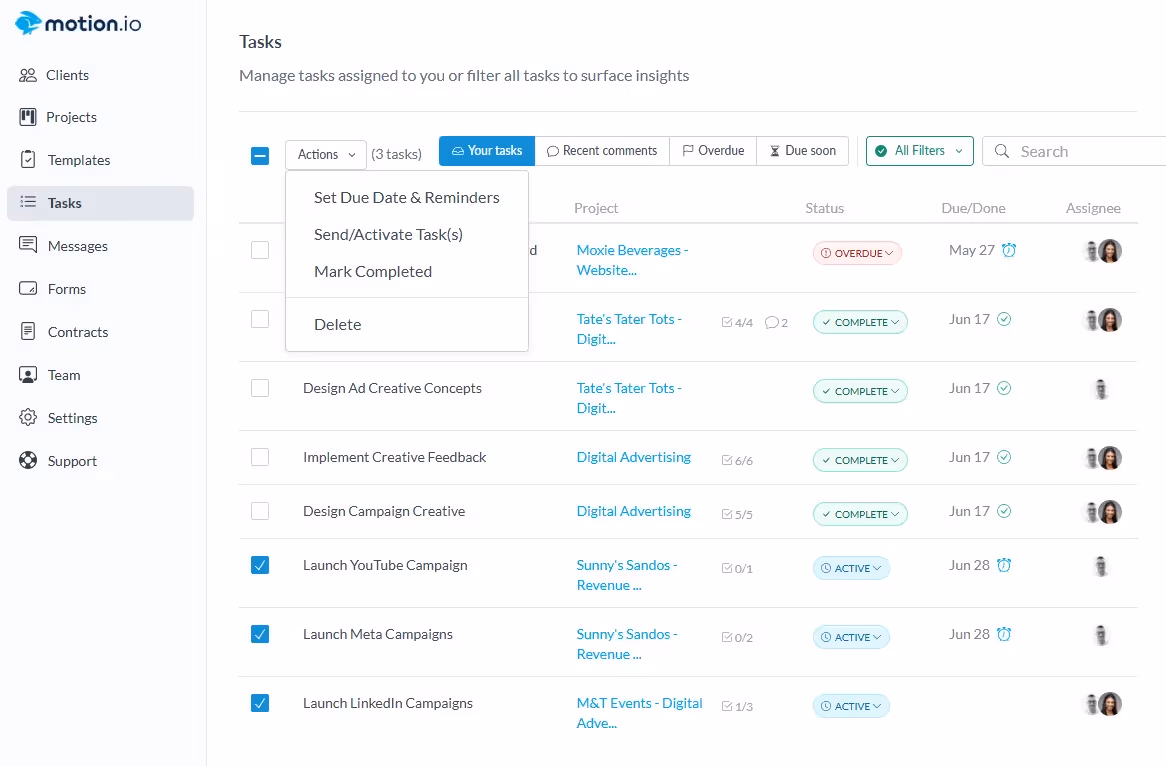
🔍 View and Filter Tasks Across Projects - See every task you're involved in, regardless of which project it belongs to, and filter them using flexible criteria like:
- Assignee
- Due date or overdue status
- Custom date ranges
- Team vs. client tasks
- Keyword search by task name
⚙️ Take Bulk Actions with Ease - Manage multiple tasks at once to streamline your workflow. Bulk actions include:
- Setting due dates and reminders
- Activating tasks
- Marking as completed
- Deleting tasks
💬 Message Center
Motion.io’s Message Center provides a centralized hub for managing all client communications—including chat messages and task comments—across every active project. It’s designed to help you and your team stay organized, responsive, and in sync.
You can access the Message Center by clicking the “Messages” tab in the left-hand sidebar of your Motion.io account. Whenever there are new or unread messages, a red notification badge will appear—so you never miss an important update from a client.
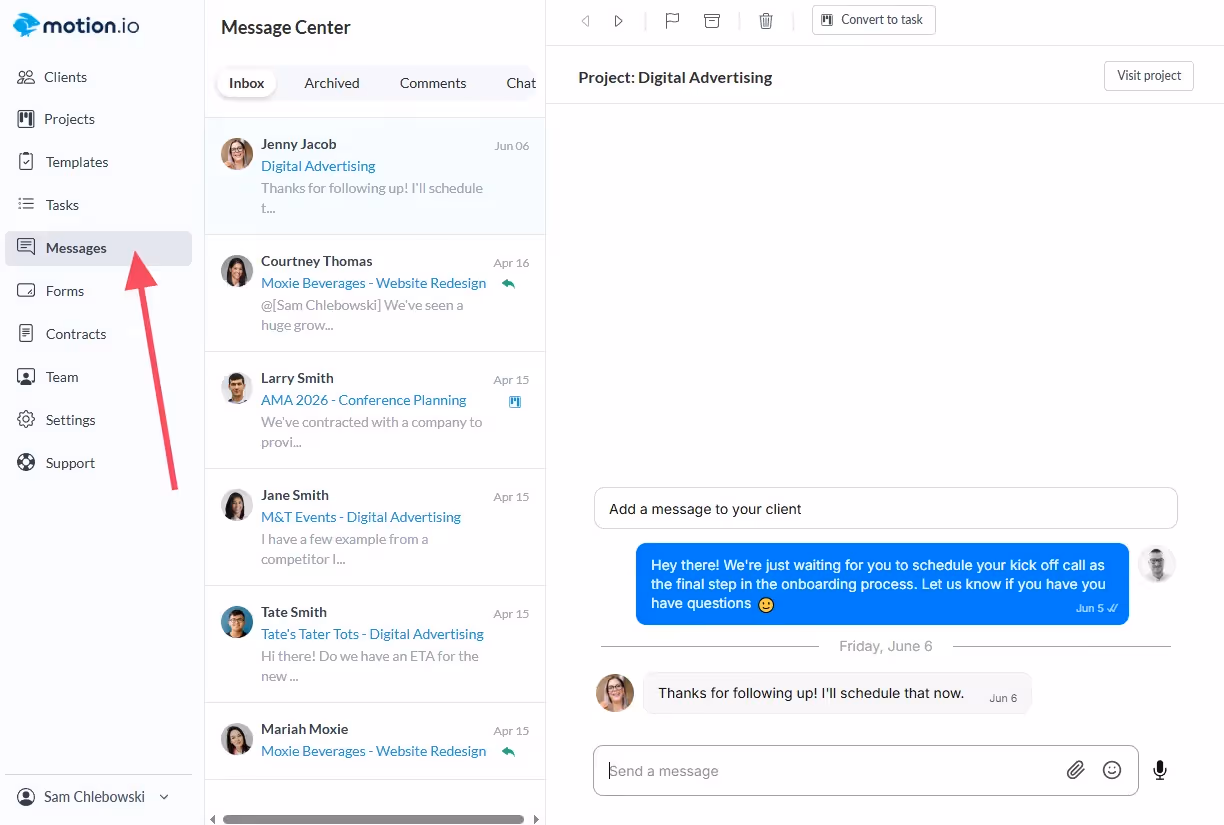
💡 Pro Tip: From the Message Center, you can convert client messages, chats, or comments directly into actionable tasks. This helps streamline your workflow and keeps everything in one place—making it easy for your team to track next steps and follow through without switching tools or losing context.
What’s Next?
You’re now ready to start using Motion.io with clients. Don’t worry about having every detail in place—Motion.io is designed to be flexible, allowing you to update projects and templates as you go.
Start simple:
Create a project. Assign a task. Build from there.
And if you ever need help, our Knowledge Base is always available. You can also reach out to our team anytime at hello@motion.io—we’re here to support you.
Not signed up yet? Try Motion.io free for 14 days and discover how easy it can be to manage client work in one place.


Scale your onboarding, not your overhead
Motion.io gives you the workflows, visibility, and automation to take on more clients--without the chaos.