
Jul 11, 2025
3 Ways to Build a Client Portal in Notion (And Mistakes to Avoid)
By
Sam Chlebowski
If you're interested to learn how to build a client portal in Notion, you're likely trying to keep projects organized and clients informed without endless email chains or scattered docs.
Notion can absolutely do that. But only if you structure it the right way.
One portal per client? One big dashboard? How do you handle permissions or keep things simple for clients who’ve never used Notion?
In this guide, you’ll learn how to set up your portal step by step (spoiler: there are three different methods to choose from), plus what to watch out for so you don’t waste time rebuilding it later.
What You’ll Need Before You Start
Before you jump into building your client portal, make sure you’ve got a few basics in place. You don’t need to be a Notion power user, but having the right foundation will make the process smoother.
You’ll need:
- A Notion account (free or paid)
- A workspace or team space to build in
- Basic familiarity with pages, blocks, and databases
- A clear idea of what your clients need to see—like timelines, deliverables, or shared documents
💡 Tip: If you’re new to Notion, it’s worth practicing with databases and permissions before sharing anything with clients.
Optional, but helpful:
- A rough layout or template to speed things up
- A naming system to keep multiple portals organized
How Many Ways Can You Build a Client Portal in Notion?
You might’ve thought there was just one way to build a client portal in Notion. But there are actually a few different approaches.
The right one depends on how your business runs.
Some people just need a clean, private page for each client. Others want a central dashboard to manage everything in one place. And sometimes, you just want a low-maintenance way to share updates without back-and-forth.
In this article, we will explore the three most practical setups for building client portals:
- One private page per client: Duplicate a portal page for each client and share it privately.
- All-in-one central client dashboard: Use a master database and filtered views to manage all clients from one dashboard.
- Public portal for quick client access: Create a view-only, publicly shared Notion page for updates and resources.
Option 1: Personalized Client Portal Pages for Each Client
This is the most common and beginner-friendly method for building a client portal in Notion.
You create a master portal template, duplicate it for each client, and share each one individually.
It works especially well for freelancers, consultants, or small teams managing up to 10 clients, particularly if you're on Notion’s free plan, which limits you to 10 guest invites.
This setup gives you full control over what each client sees and lets you tailor the portal to their needs. The trade-off? You’ll be doing more manual updates as your client list grows.
Here's how to do it:
Step 1: Log in to Notion and create a new page
Head to notion.so and log in to your workspace. If you don’t already have one, Notion will guide you through setting it up (it’s quick and free).
Once you’re in, create a new page by clicking the “+ Add new” button in the left-hand sidebar (under “Private”).

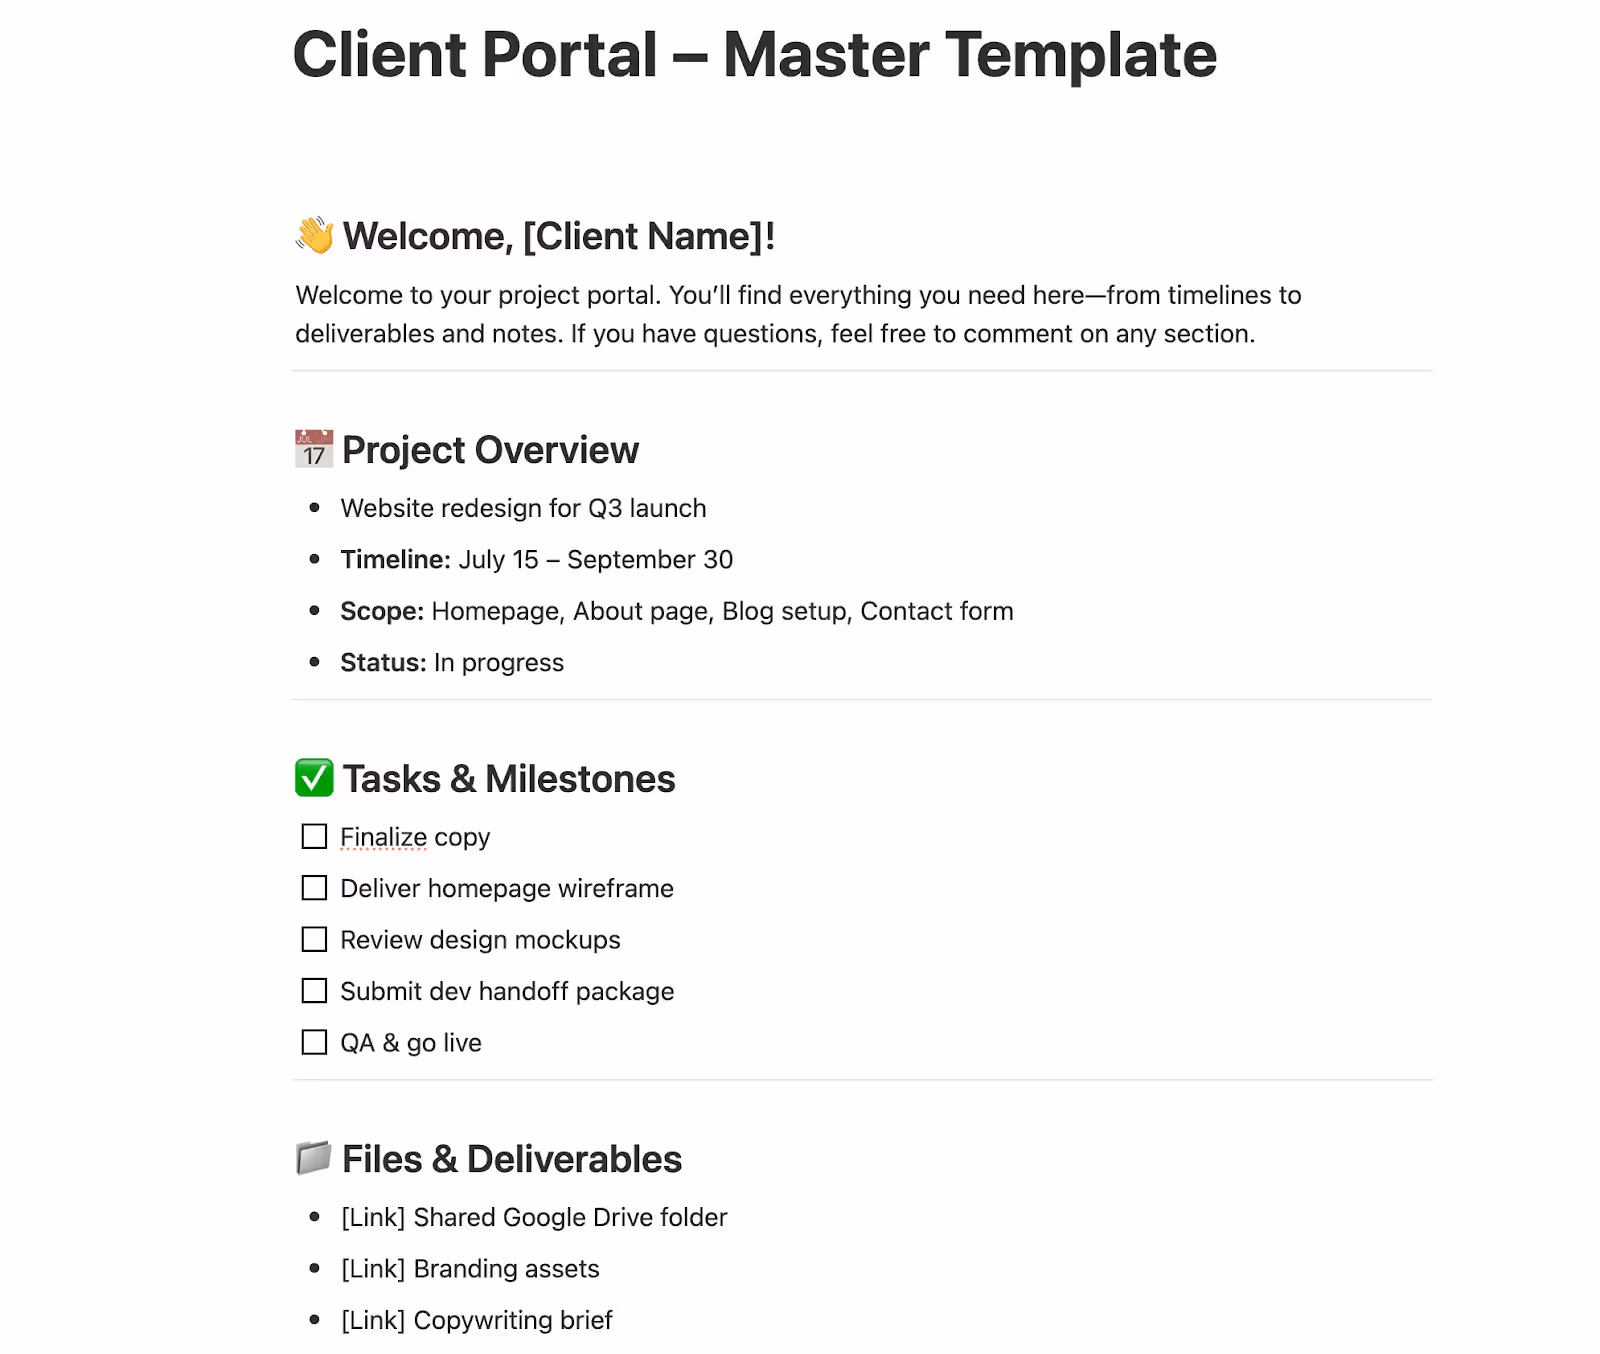
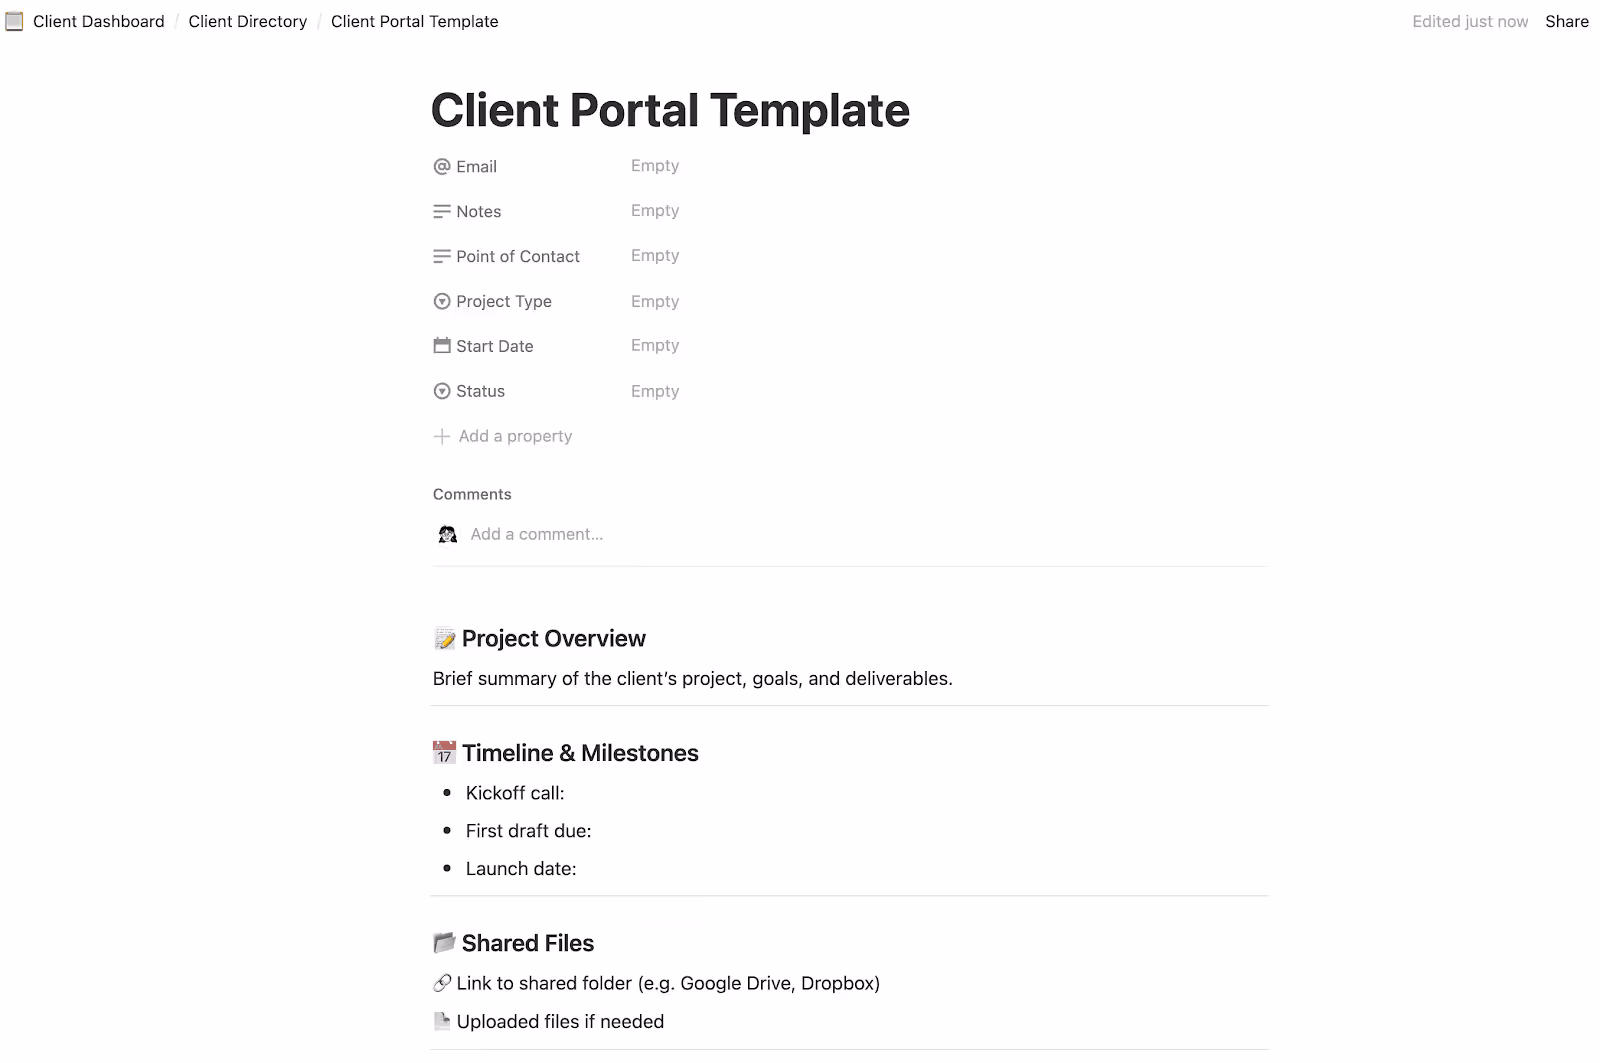
You can name it something like “Client Portal – Master Template” or “Client Portal Template”. This will be your base layout that you’ll duplicate for each new client.
💡 Tip: Add an icon or cover image to give your portal some personality. It’s a small touch that makes a big difference for the client experience.
Step 2: Design the master portal layout
Now that you’ve created your master portal page, it’s time to build the structure your clients will actually use.
A well-organized layout makes your portal easier to navigate and reduces the chances of clients getting confused or emailing you for updates.
Here’s a simple layout you can create using Notion’s built-in blocks:
- 👋 Welcome message
Add a quick intro at the top. Use a callout block or text to greet the client and let them know what to expect.
Example: “Hi [Client Name], here’s everything you need to stay up to date on your project. If you have questions, just leave a comment anywhere on this page.” - 📅 Project Overview
Use a paragraph or bullet list to summarize key goals, deadlines, and deliverables. - ✅ Task List or Timeline
Use a simple checklist or table to show what’s done, what’s in progress, and what’s coming up. - 📁 Files & Deliverables
Add links to shared folders (like Google Drive or Dropbox), or embed files directly if you have uploads. - 📝 Meeting Notes or Feedback
Add a section where you can paste in meeting recaps or let the client leave comments. - 🔗 Quick Links
Include links to Loom videos, reports, tools, or other platforms your client might need to access during the project.
💡 Pro tip: Keep it simple. Use toggle blocks to group content and reduce visual clutter. And don’t worry about getting it perfect; you can always adjust your template later.
Step 3: Duplicate the page for each client
Once your master layout is ready, it’s time to duplicate it for each client you work with. This way, you don’t have to rebuild the structure every time. You just make a copy, rename it, and customize the content.
Here’s how to do it:
Click the ••• (three dots) in the top-right corner of the page and select Duplicate.
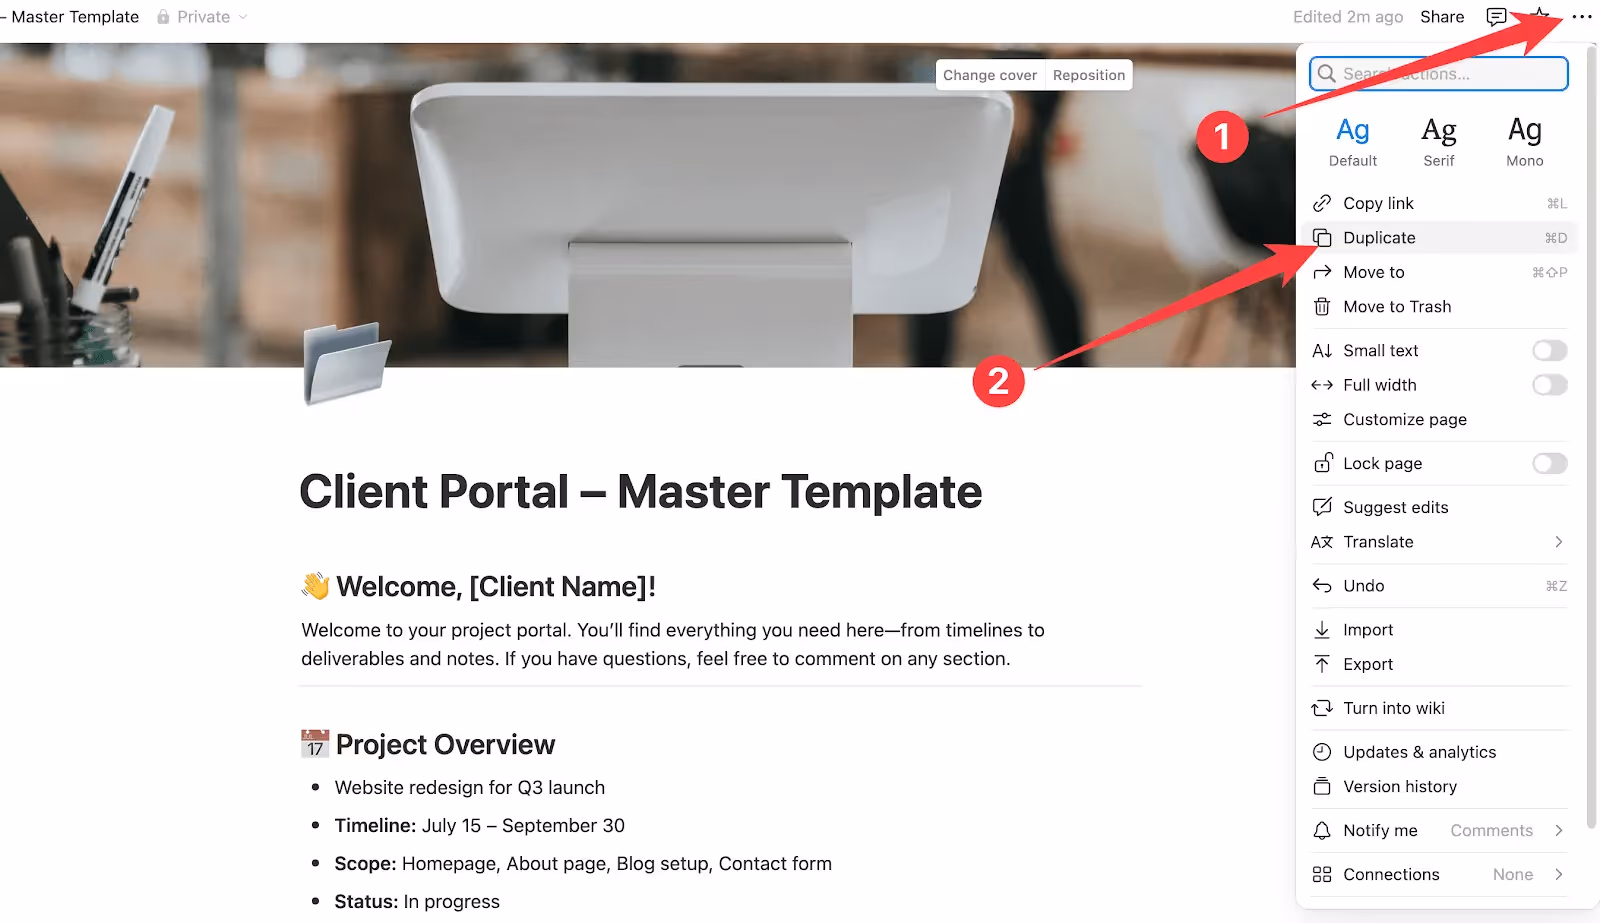
Rename the new page something like “Client Portal – Acme Co.” or “Client Portal – Jane Smith.”
Open the duplicated page and update the details so it’s tailored to that specific client.

💡 Pro tip: If you manage lots of clients, you can organize all your client portals under a main “Client Dashboard” page to keep your sidebar tidy.
To do this, simply drag each portal page onto the dashboard page in the sidebar. Or, open the page, click ••• → Move to, and choose “Client Dashboard.”

Step 4: Share the portal with your client
It’s time to give your clients access. You’ve got two simple options:
1) Invite them directly
Open the client’s portal (e.g. Client Portal – Jane Smith) and click the “Share” button in the top right corner.
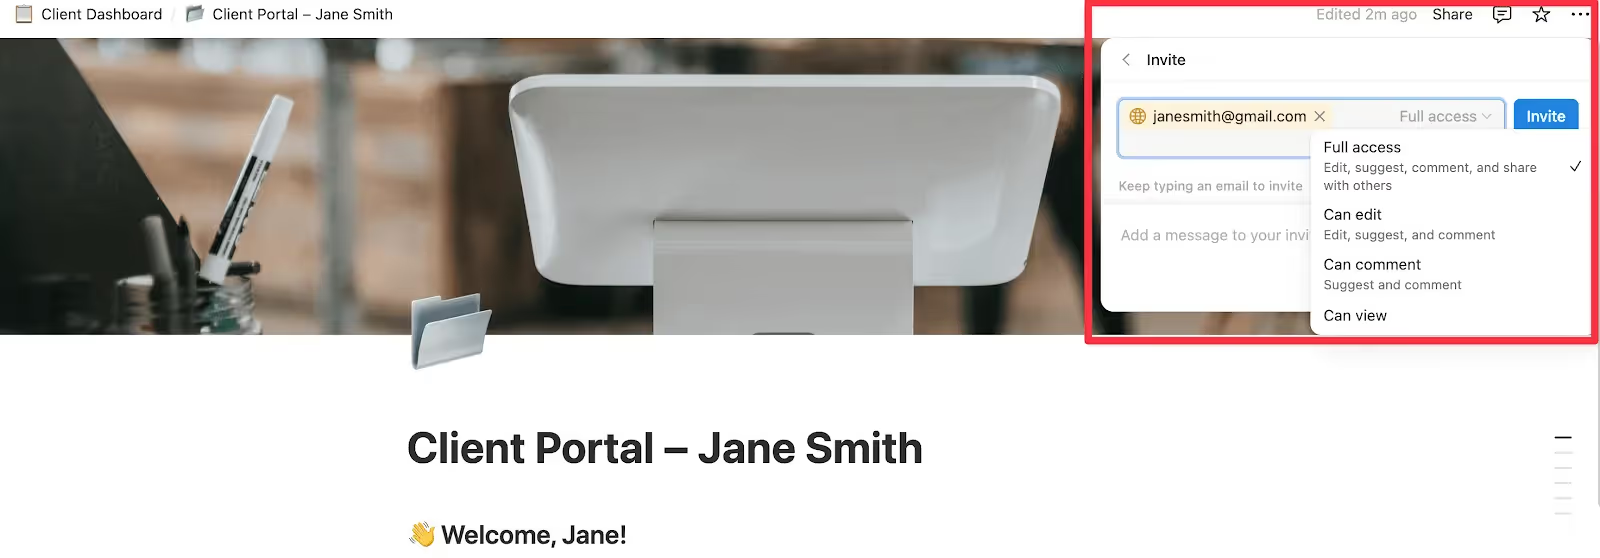
Just type in their email address, then choose the right level of access.
If you want to keep things simple and secure, “Can view” is usually the best choice. But if you’d like your client to leave comments or ask questions right on the page, go with “Can comment” instead.
2) Share a link (view or comment access)
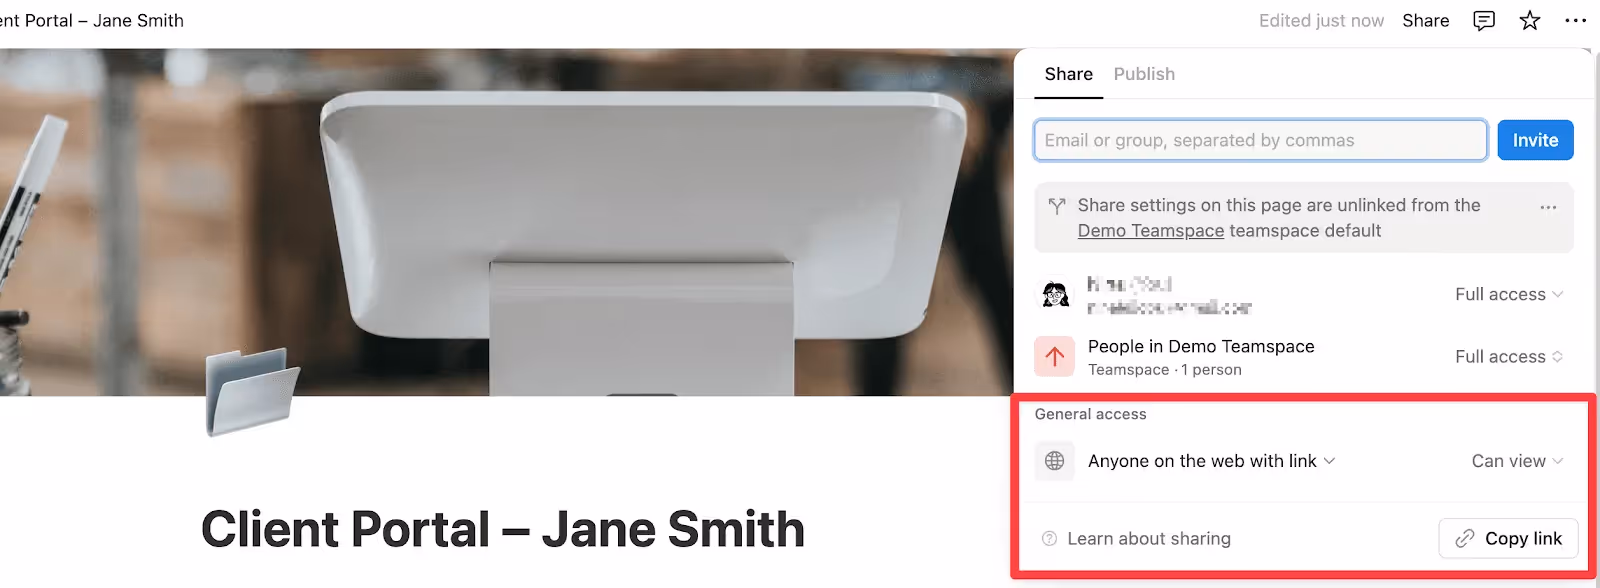
If you don’t want to invite your client by email, you can share a link instead:
- Click Share in the top right
- Change “Only people invited” to “Anyone on the web with link”
- Click Copy link and send it to your client
Just note: if you don’t change the access setting, your client won’t be able to open the link.
💡 Pro tip: If you're on Notion’s free plan, you're limited to 10 guests total, not per page. That’s why this method works best for freelancers or small teams managing under 10 active clients.
Option 2: Central Dashboard with Database Views
If you’re working with more than 10 clients or want to keep things highly centralized, this method gives you a bird's-eye view of everything.
Instead of duplicating pages for each client, you build a single dashboard that pulls in filtered views from multiple databases (like Tasks, Files, Notes, etc.). It’s more complex to set up, but easier to maintain once it’s running.
Step 1: Log in to Notion and create a new page
Start by logging in to your Notion account. You can use a free or paid plan—just make sure you’re working in the right workspace (personal or team), depending on how you manage clients.
Then, create a new top-level page called something like:
- Client Dashboard
- Client HQ
- Client Management Hub
This will be your master portal, where you’ll bring in all other information via linked databases.
Note: You can create the dashboard in your Private section or inside a Teamspace, depending on whether you work solo or as part of a team. This means that your dashboard will be visible to you/your team only.
Step 2: Set up your Client Directory database
Within your dashboard, you will need to create a table and name it something like "Client Directory". This will be the hub that connects to every client-specific item — tasks, meetings, invoices, and more.
Type /table and select “Table view · Database” from the menu.
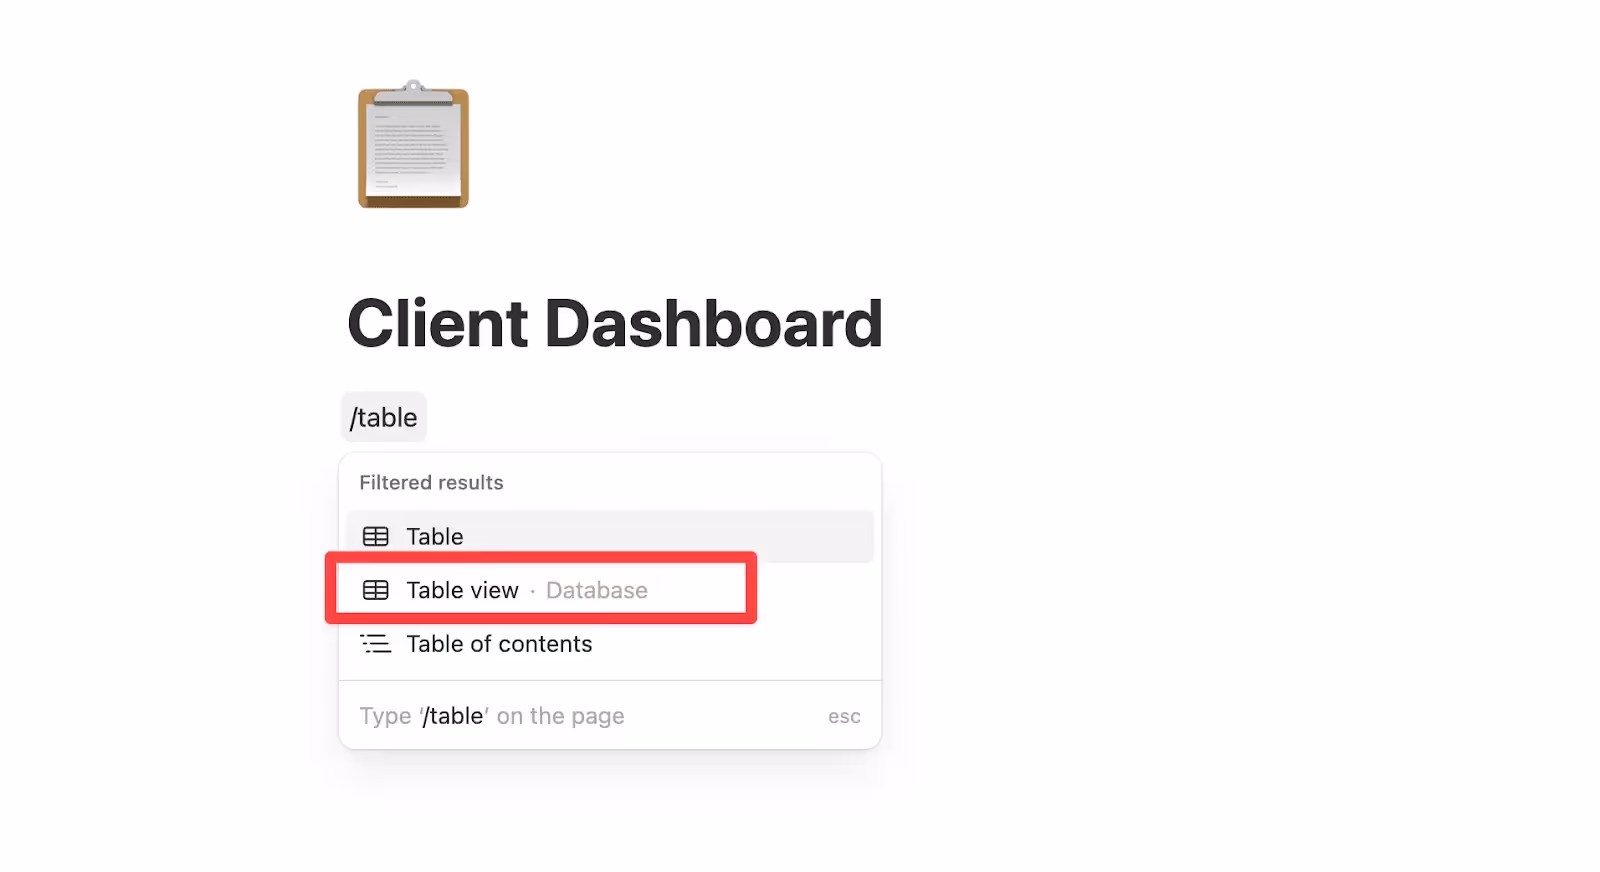
Give it a name, then add properties such as:
- Point of Contact
- Project Type
- Start Date
- Status (e.g., Active, Paused, Completed)
- Notes or Internal Tags

💡 Pro tip: Switch to a Gallery view if you prefer a visual layout with logos or images on each card.
Step 3: Add content inside each client’s page
Each row in your database is more than just a line of info — it opens into a full Notion page. That’s where you’ll actually build the client-facing content (the main dashboard itself stays private. It’s for you or your team to manage everything behind the scenes).
To get started, click the “Open” button on any row.
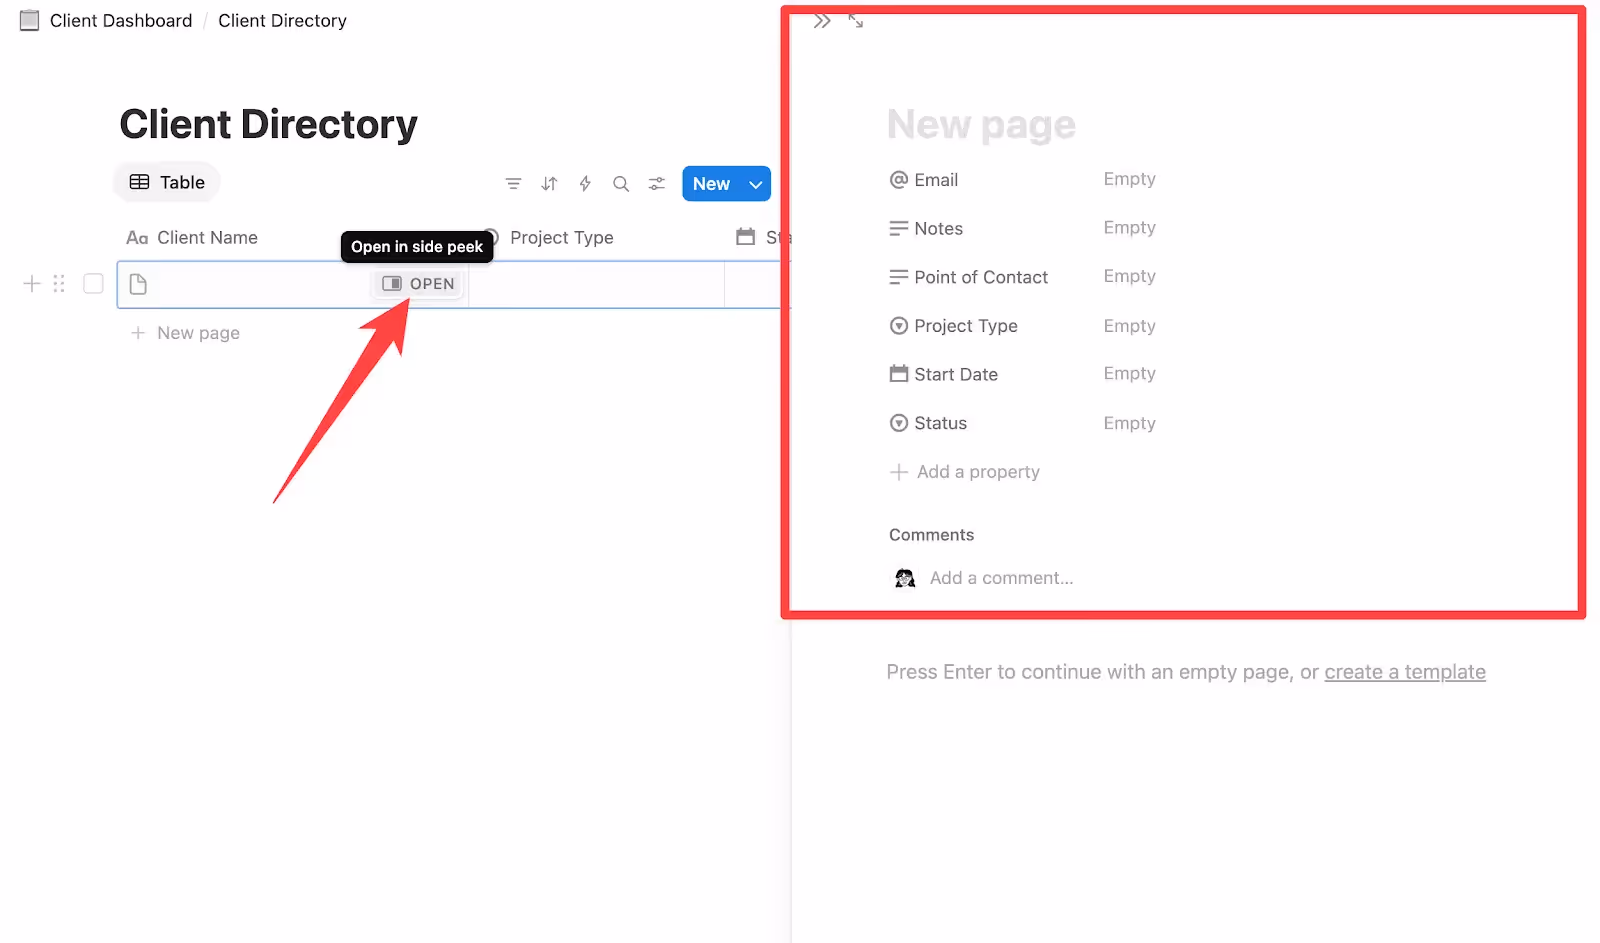
Inside, you can add sections like:
- Project Overview
- Shared Files
- Meeting Notes
- Key Contacts
- Tasks or Next Steps
The columns in your table hold quick-reference info (like project status or start date), while the full page gives you space for all the detailed content and collaboration.
💡 Pro tip: Once you’ve built one client page, duplicate it for new entries to maintain a consistent layout.
Step 4: Turn your client page into a reusable template
When you’re happy with your client portal, don’t start from scratch every time. Instead, save yourself time by turning it into a reusable template.
Here’s how to do it:
In your Client Directory table, click the down arrow next to the blue “New” button.
Select “+ New template.”
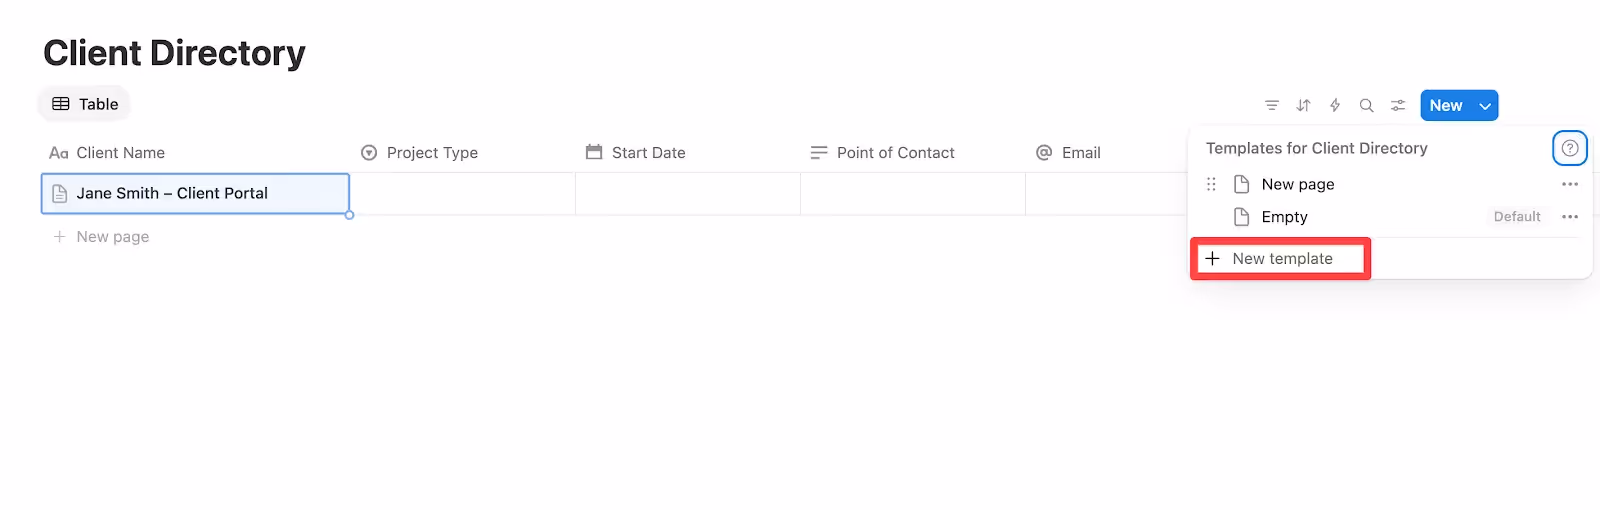
Inside the blank template page, paste your preferred layout (like the one you just created).
Give your template a clear name like “Client Portal Template.”
Now, whenever you click “New,” Notion will auto-fill that layout for you.
💡 Pro tip: You can create multiple templates for different services or project types — for example, one for website builds, another for marketing retainers, etc.
Step 5: Create supporting databases for tasks, notes, and deliverables
With your main Client Directory ready, it’s time to add the “building blocks” that make your portal even more useful.
These are your supporting databases — separate tables for tracking things like:
- ✅ Tasks: To-do items, milestones, or project phases
- 📝 Meeting Notes: Call summaries, client feedback, decisions
- 💰 Invoices: Billing history, due dates, payment status
- 📦 Deliverables: Files, links, or documents you’re handing off
Instead of creating these inside each client page manually, you'll build centralized databases and then link them back to specific clients using Notion’s “Relation” feature (we’ll cover this in the next step).
How to set up a supporting database (example: Tasks)
- Create a new database (type /table → select Table view · Database)
- Name it something like Tasks
- Add properties such as:
- Task Name
- Status (To Do / In Progress / Done)
- Due Date
- Assignee
- Priority
You’ll connect this database to your Client Directory in the next step using “Relations”, so you can assign each task to a client and show just their tasks inside their page.
💡 Pro tip: Want to keep your workspace extra tidy or reuse databases across multiple dashboards?
You can also create your Tasks, Files, and Notes as standalone pages and embed them into your dashboard using “linked views”.
To do this:
- Create your databases as full pages from the sidebar.
- In your Client Dashboard, type /linked view of database and choose the desired database.
It works exactly the same — it just gives you more flexibility in how you organize your workspace.
Step 6: Link everything using Relations
Now you’ll want to link your supporting databases back to the right client so everything stays connected.
Go to your Tasks database (or any supporting one) and click the “+” to add a new column. Select “Relation” as the property type.
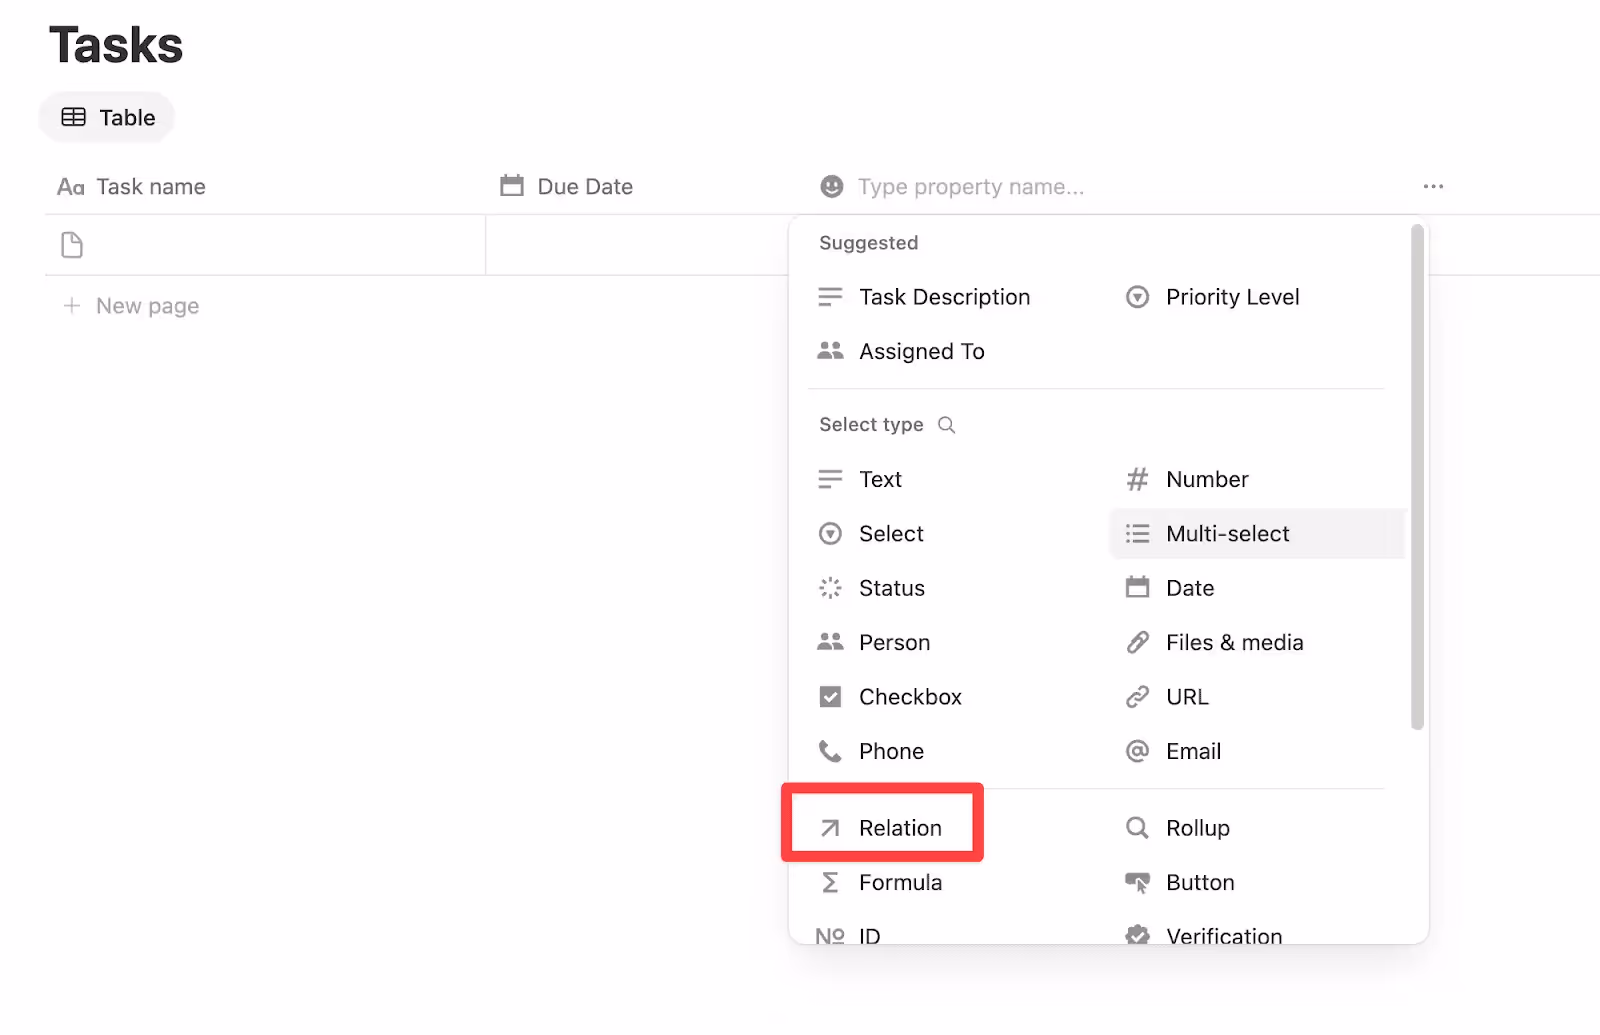
Choose “Client Directory” as the database to link to. This lets you tag each task to a specific client.
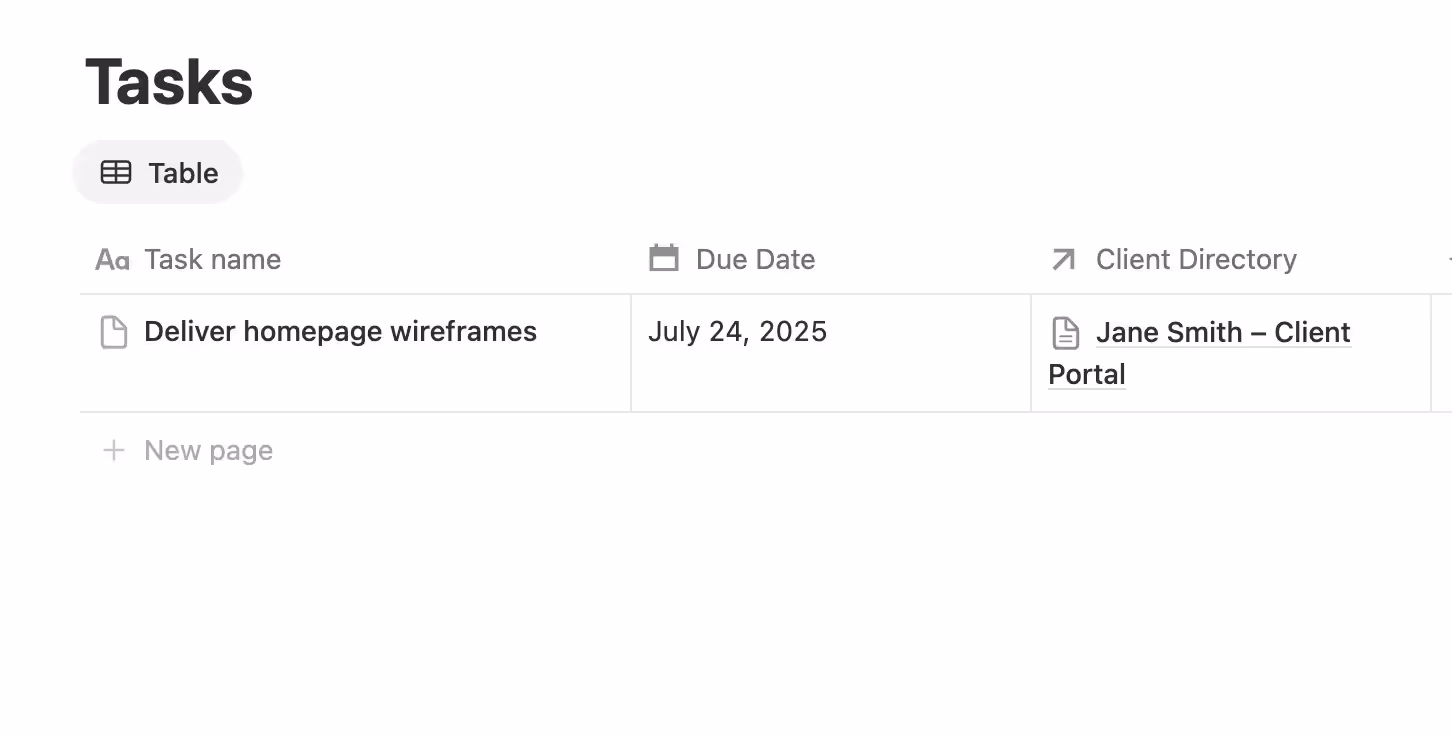
Once you've added a relation property, you can use a filter to show only that client’s items in their portal page.
For example, inside a client’s portal page, you might want to show only their tasks.
To do that:
- Open their page in the Client Directory
- Type /linked view of database and select your “Tasks” database
- Click Filter → Add advanced filter
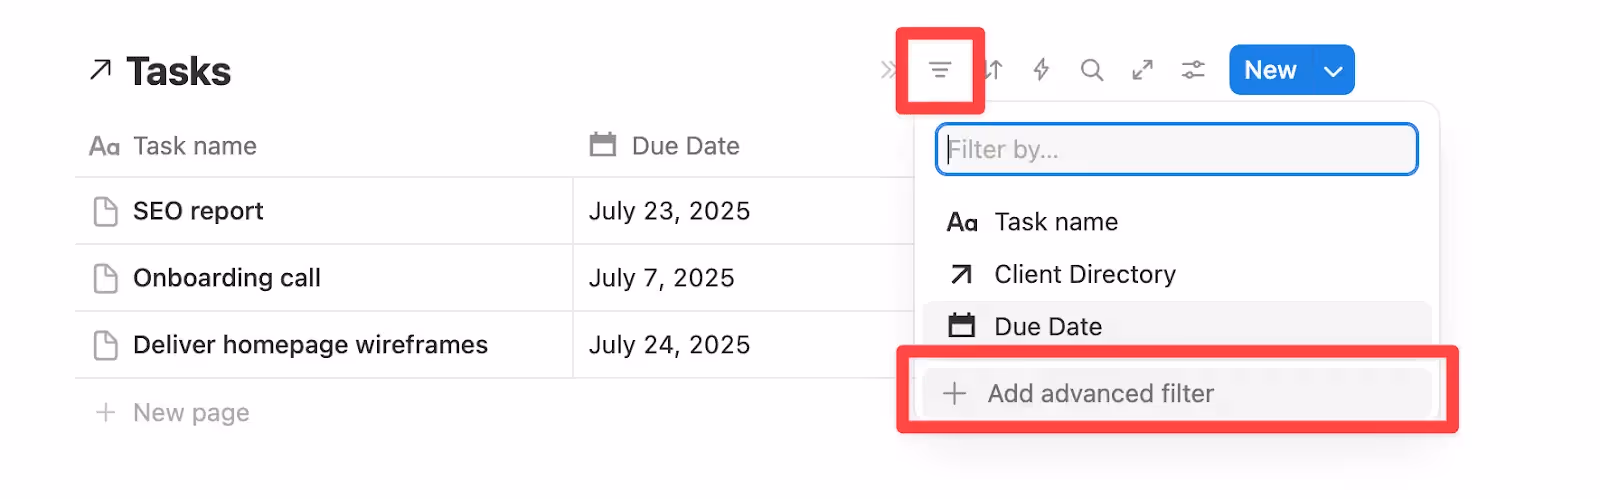
- Set it to: Client Directory→ contains → [This client]
Now your client sees only the tasks linked to them.
Step 8: Design your internal dashboard layout
This is your internal command center, so take a moment to design it into a clean, easy-to-navigate layout.
If you created your databases inside the dashboard page, they’re already there — you don’t need to re-add them. Just format them to suit your workflow.
If you created them elsewhere (like in a separate “Data” page), you can bring them in by typing /linked view of database and selecting the one you want.
Tips for organizing your dashboard:
- Add headings above each database (e.g., “Team Tasks,” “Meeting Notes”)
- Use columns to display content side by side
- Collapse large sections into toggles to keep things tidy
- Apply filters or groups to make each view more useful
(e.g., show only tasks due this week, or group them by client)
Step 9: Share only what clients need to see
Your internal dashboard is for your team. But what if you want to give clients access to specific parts (like their tasks or files) without showing everything?
You can do that by sharing filtered database views as individual public links or embedding them inside a client-facing page.
Here's how:
- Create a client-specific page (like “Jane Smith – Client Portal”)
- Embed filtered views of your databases (Tasks, Files, etc.) that only show that client’s info. To do this: type /linked view of database, choose the database, then apply a filter (e.g., “Client is Jane Smith”).
- Click the Share button on any client page, then set the appropriate permissions. You can either invite a specific client by email or copy the link and adjust access settings (like “Can view”)
Option 3: Public Portal for Quick Client Access
This approach is best if:
- You don’t need clients to collaborate or comment
- You just want to share files, links, updates, or status info
- You want zero friction (no logins, no Notion accounts)
Think of it like a mini homepage or live memo board for clients to check in when needed.
Step 1: Create a new page
Log in to your Notion workspace and click “+ Add new”.
Name it something like:
- Client Updates
- Welcome Hub
- Project Status Page
- Or name it after the client
You can use a blank page or choose a template, but keep it simple and clean.
Step 2: Add basic sections your client needs
Inside your page, add any of the following, depending on what’s relevant:
- 📌 Project Status
Use a callout block or a toggle to give a high-level update - 📁 Shared Files & Links
Paste in Drive/Dropbox links or embed PDFs directly - 📅 Timeline or Key Dates
Add a basic calendar or checklist with upcoming milestones - 📞 Contact Info or Support Details
Include who to reach out to and how
You can also embed videos (e.g., Loom updates), calendars, or status boards.
💡 Pro tip: Use headers and dividers to make it skimmable. The key is to keep the layout client-friendly.
Step 3: Publish the page
Once your content is ready to go, it’s time to share it with your client.
Just click the Share button in the top right corner of the page. In the pop-up, switch the setting to “Anyone on the web with the link” and make sure the access level is set to “Can view.”
✅ No Notion account required — they can access it from any browser.
Common Mistakes to Avoid When Building Your Client Portal
Notion gives you a lot of flexibility, which also means there are more ways things can go wrong. Here are the most common mistakes people make (and how to avoid them).
1. Overcomplicating the portal too soon
If you try to build the perfect system from day one, you’ll probably never finish. Or worse, you’ll launch something too cluttered for your client to actually use.
What to do instead: Start with the basics. Add things like Tasks, Notes, or status rollups after you’ve tested what clients need.
2. Skipping templates and doing everything manually
If you’re copy-pasting layouts or manually recreating pages each time, it’s easy to miss something or break consistency.
What to do instead: Turn your layout into a template so every new portal starts with the same structure, especially inside a database.
3. Messing up sharing settings (or forgetting to check them)
A broken link, incorrect permission level, or forgotten toggle can expose internal content.
What to do instead: Always test your portal before sending it. Use an incognito browser or a dummy Notion account to double-check what clients can see.
4. Not linking your databases correctly
If you’re using a dashboard with supporting databases (Option 2), forgetting to set up Relation properties means nothing is connected, and filtered views won’t work.
What to do instead: Always add a Relation to your Client Directory so you can filter content by client, roll up task status, and keep everything synced.
5. Ignoring the client’s experience
Your client doesn’t need to see every toggle, status, and system you’ve built. In fact, the more minimal and clear, the better.
What to do instead: Use headers, toggles, and dividers to make content skimmable. You can also add a simple welcome message or “Start Here” note at the top of every portal.
6. Using inconsistent naming
Calling one page “Client Portal – Jane Smith” and another “J.S. Dashboard” may not seem like a big deal at first. But when you’re managing 15 clients, it will make navigation difficult.
What to do instead: Create a simple naming system and stick to it (e.g., Client Portal – [Client Name], or [Client Name] HQ).
Are Notion Client Portals Really Enough?
If you’re already using Notion for internal work, building a client portal in it makes perfect sense. It’s flexible, familiar, and gives you full control over how things are structured.
For freelancers and small teams who only need to share a few pages or views with clients, it works, especially if you don’t mind a little setup and manual upkeep.
But once your client load grows or your workflows get more complex, Notion might not be enough.
Why?
❌ Tracking client tasks requires building custom databases and filters from scratch
❌ Collecting files lacks structure and often requires outside tools
❌ Reminders and due dates aren’t automated without extra integrations
In short: Notion gives you the tools, but you’re the one building the system.
This is the point where it makes sense to start exploring client portal software that’s built specifically for client-facing work.
Motion.io lets you create fully branded, login-free portals that can collect files, approvals, and signatures without multiple email threads or manual follow-ups. You can assign tasks to clients (with automatic reminders), embed forms, and keep everything streamlined from day one.
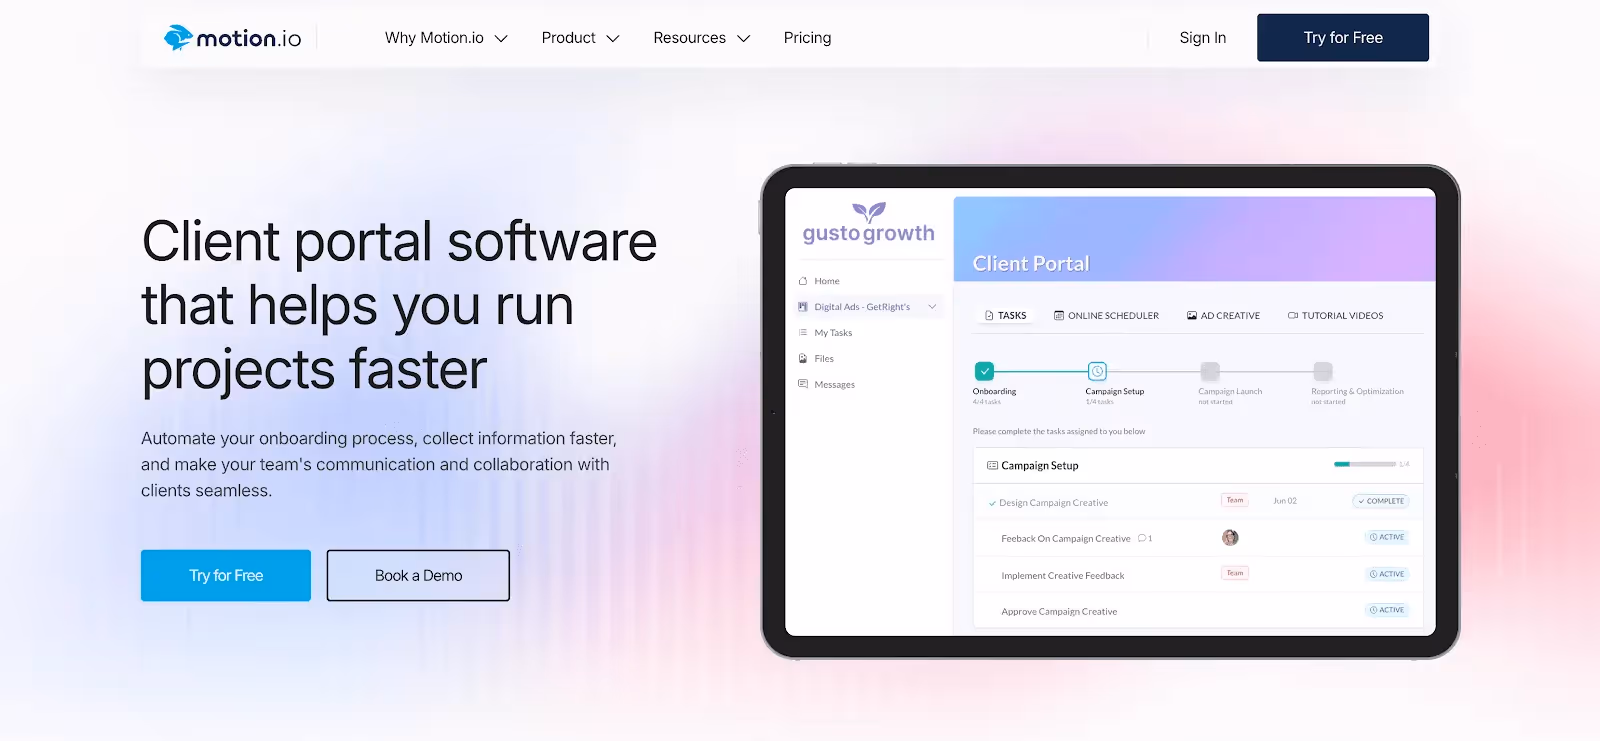
The best part? There’s no need to build anything from scratch. You get built-in features like a client messaging center, real-time collaboration, and a layout designed to make your client experience feel polished and professional.
Notion might work just fine for now. But if you’re ready to upgrade to a platform that handles it all and saves you time, Motion.io is the smart next step.


Scale your onboarding, not your overhead
Motion.io gives you the workflows, visibility, and automation to take on more clients--without the chaos.