
Mar 13, 2025
CRM Integration: Connect Pipedrive, HubSpot, GoHighLevel, and more to Motion.io with Zapier
By
Sam Chlebowski

Introduction: From Closed Deal to Smooth Client Onboarding
Your CRM is where deals are won — but onboarding is where client relationships truly begin.
Without automation, most teams rely on manual tasks, Slack messages, and email threads to hand off new clients after a sale. That slows down your onboarding process and leaves room for mistakes.
With Motion.io’s CRM integration via Zapier, you can automate that entire handoff.
When a deal is marked as “Closed Won” in your CRM (like Pipedrive, HubSpot, or GoHighLevel), Zapier instantly triggers Motion.io to:
✅ Create a new project from one of your Motion.io templates
✅ Invite your client to their branded, loginless Motion.io portal
✅ Allow clients to complete onboarding tasks like signing contracts, filling out forms, uploading files, and sharing key information
Why Connect Your CRM to Motion.io Using Zapier
1. Instantly Launch Projects from Your CRM
When a deal is marked as “Closed Won” in your CRM, Zapier automatically creates a new project in Motion.io — based on one of your saved templates.
Your onboarding workflows, tasks, and client invites all happen instantly, without your team lifting a finger.
2. Deliver a Seamless Client Experience
Your clients immediately receive access to a branded, loginless portal where they can:
- Sign contracts
- Complete onboarding forms
- Upload documents or creative assets
- Provide key project information
All within one secure, beautifully branded Motion.io experience.
3. Save Time and Eliminate Handoffs
By automating the CRM → Motion.io connection, your sales, success, and fulfillment teams stay perfectly aligned.
No more duplicate data entry or forgetting to create projects after deals close — Zapier handles it for you.
How Zapier Connects Motion.io with Your CRM
Zapier acts as the automation bridge between your CRM and Motion.io.
When a specific event (called a trigger) occurs in your CRM — for example, when a deal stage changes to “Closed Won” — Zapier automatically performs an action in Motion.io, such as “Create Project from Template.”
The result is a seamless, hands-free workflow that saves time and ensures every new client is onboarded consistently and professionally.
Before you set up this workflow, here’s what you’ll need:
1. Zapier Account
If you’re new to Zapier, it’s a powerful automation platform that allows you to connect thousands of different software tools — including your CRM and Motion.io — through automated workflows called “Zaps.”
If you haven’t signed up yet, create a free Zapier account here.
2. Motion.io Project Template
Before building your Zap, you’ll need a Motion.io template that serves as the foundation for new projects.
This template determines what tasks, forms, and requests are included in each client’s onboarding portal.
Learn more about creating templates in Motion.io →
3. Motion.io Template Automations (Optional, but Recommended)
In this guide, you’ll set up a Zap that automatically:
- Creates a new Motion.io project from your selected template
- Invites the client to their personalized, loginless portal
- Assigns that client to the appropriate onboarding tasks
However, the Zapier workflow itself does not automatically activate those tasks.
To ensure tasks begin running right after the project is created and the client is invited, you’ll want to add a Motion.io automation inside your template.
Learn how to set up automations in Motion.io →
Example Workflow: Connect Pipedrive to Motion.io Using Zapier
In this example, we’ll walk through how to connect Pipedrive to Motion.io using Zapier.
Once you’ve completed this setup, you can adapt the same workflow for HubSpot, GoHighLevel, or other CRMs supported by Zapier.
Step 1: Create a New Zap and Specify a Trigger Event
In your Zapier account, click the button to create a new Zap.
To create a trigger event, click the option at the top of your Zap and search for the app you want to use. The example Zapier workflow in this guide triggers when a person's status in Pipedrive (CRM software) updates to "Send Contract."
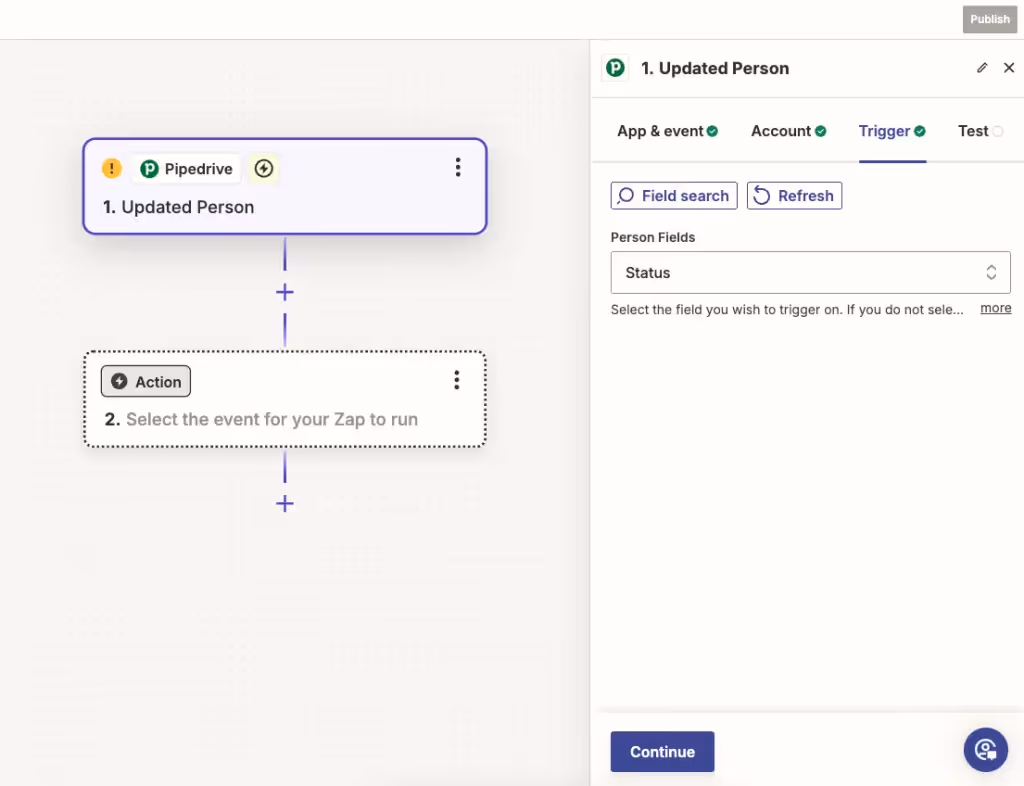
The trigger example shown in this guide is just one of thousands of options available in Zapier. In addition to using virtually any other CRM, other trigger options include a specific form being submitted or when a message is sent to a particular Slack Channel.
Step 2: Add a Filter Action to Your Zap (Optional)
If the trigger you are using to start a Zap fires for a wide variety of updates and you'd like to ensure it only fires for a specific update, it is sometimes necessary to add a filter.
To add a filter to a Zap, click Zapier's "Filter" action and specify the parameters that will allow future steps in the workflow to fire.

The filter example in this guide is configured so that future steps will only fire if a person's status is updated to "Send Contract."
Step 3: Add an Action to "Create Project" in Motion.io
For the final step of your Zapier workflow, click the button to add a new action and search for "Motion.io" in the modal. Then, select "Create Project" under "App & Event" and navigate to the "Action" tab to map your fields.
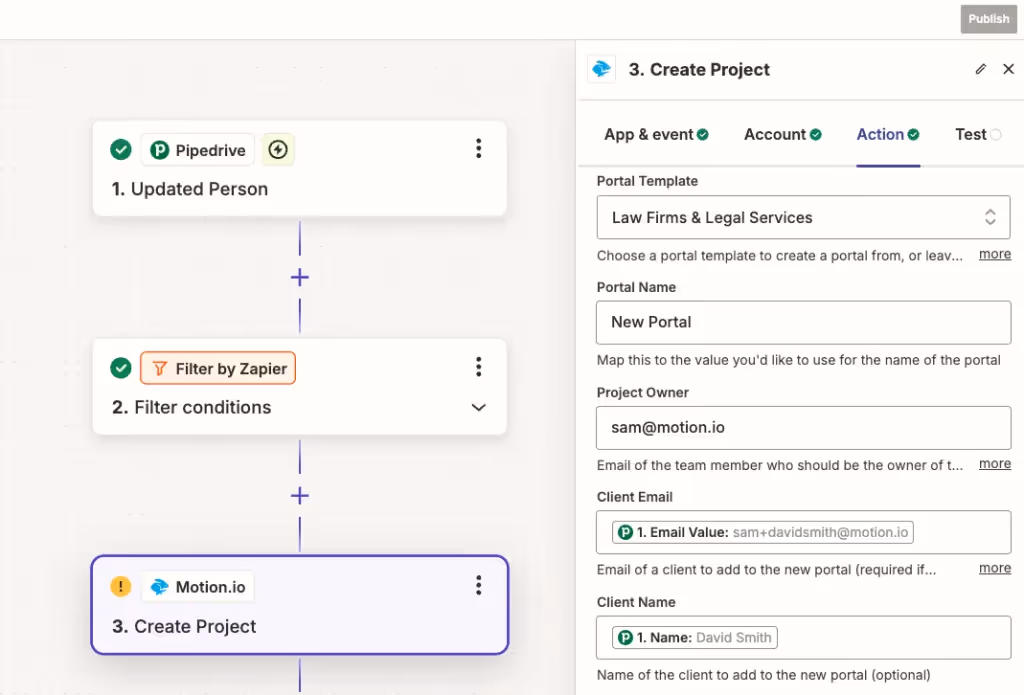
There are numerous ways you can map fields in the "Create Project" action, but the above screenshot showcases a typical example, with fields mapped as follows:
- In the "Template" field, "Legal Services" is selected as the template this Zap will automatically create new projects from.
- The fields for "Portal Name," "Client Name," and "Client Email" have been mapped to pull in the corresponding information from the Pipedrive trigger event.
- The "Immediately assign all task(s) to clients" field is set to "True."
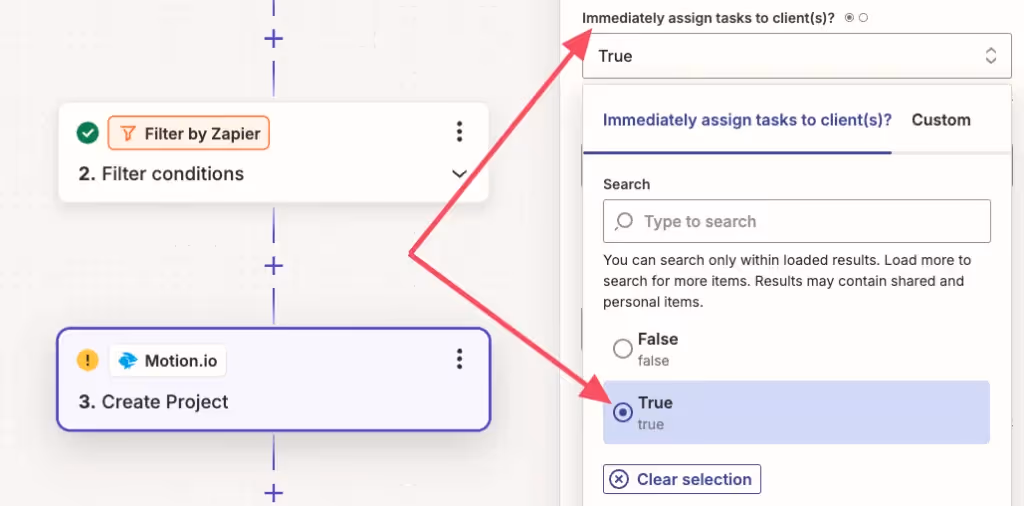
While you have control over how you configure most of the fields in your Zap, you must set “Immediately assign all task(s) to clients” to “True.” Otherwise, this workflow will not work as intended.
What Happens Next: Your Client’s Experience
As soon as your client receives their invite, they can access their Motion.io portal — no login required.
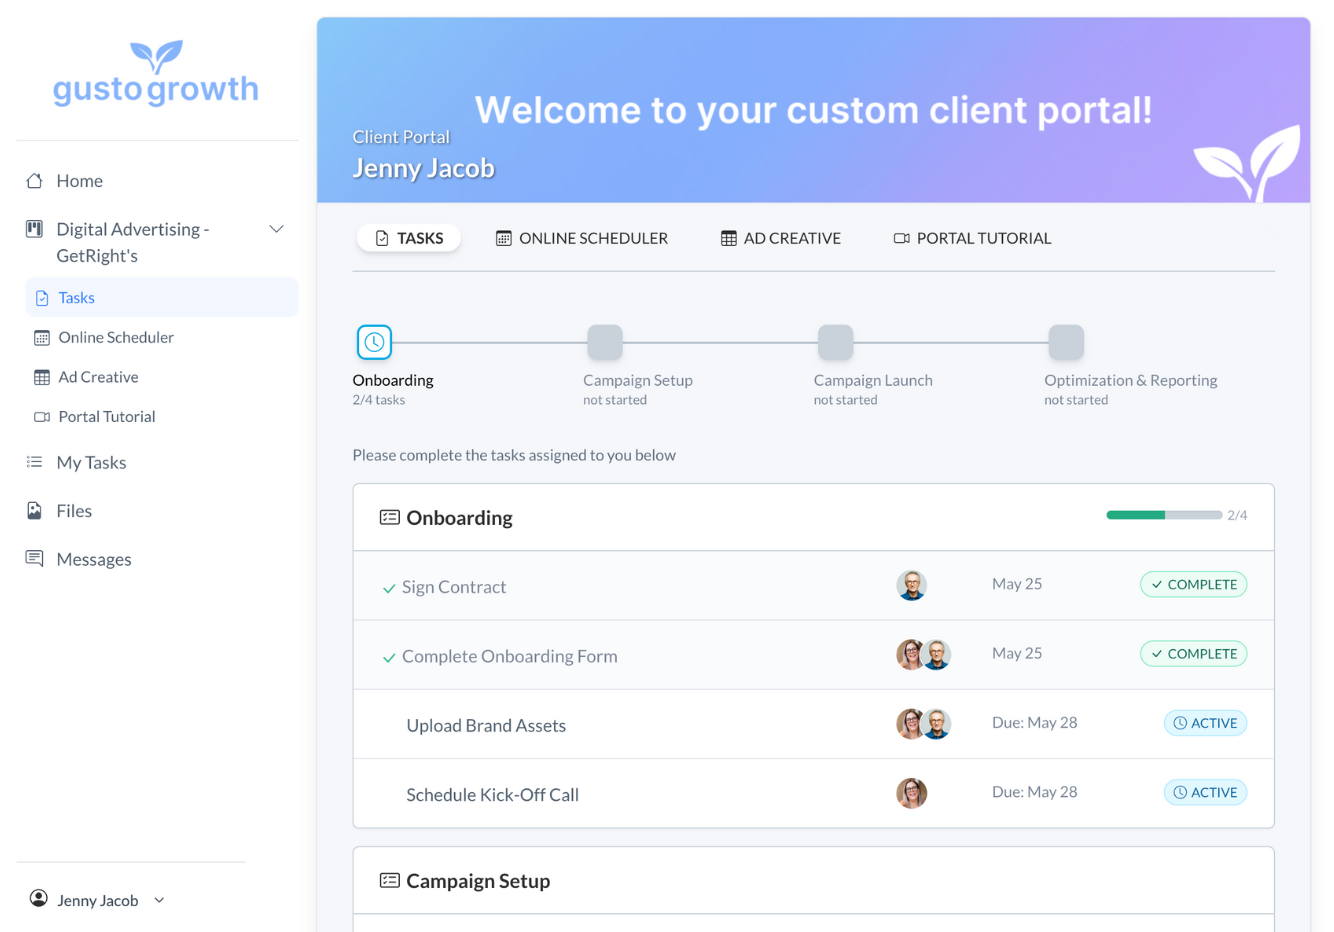
From there, they can:
- Sign contracts and agreements
- Complete onboarding questionnaires
- Upload logos, files, and creative assets
- Review kickoff information or welcome videos
Meanwhile, your team sees all submissions, signatures, and updates in real time within Motion.io. This eliminates the back-and-forth emails that often delay project starts.
Other CRMs You Can Connect
While this guide showcases a Pipedrive → Motion.io workflow, Zapier supports hundreds of CRMs. You can easily replicate this same automation using HubSpot, GoHighLevel, and many others.
For example:
- HubSpot → Motion.io: Trigger onboarding when a deal stage changes to “Closed Won.”
- GoHighLevel → Motion.io: Create projects when a contact is tagged with "Customer" or contact type changes from Lead > Customer.
Each follows the same Zapier pattern — trigger in your CRM → create project in Motion.io.
Conclusion: Automate Your Client Onboarding Today
Integrating Motion.io with your CRM through Zapier takes your client onboarding from manual to automatic.
Every time your team wins a deal, Motion.io can instantly:
- Create a new project from a template
- Invite your client to their branded, loginless portal
- Begin onboarding — with contracts, forms, and uploads — right away
No manual steps. No missed handoffs. Just a seamless experience from deal to delivery.
Start your free trial today and connect your CRM to Motion.io using Zapier.


Scale your onboarding, not your overhead
Motion.io gives you the workflows, visibility, and automation to take on more clients--without the chaos.